Intro
SwiftLint is a popular tool among iOS developers that helps enforce swift style and conventions. Loosely based on Github’s Swift Style Guide, it helps ios teams maintain a uniform swift coding style & standard, while reducing the tedious manual work of checking for uniform code styles in code reviews.
Incorporating SwiftLint into your iOS development workflow can save time and improve code quality by identifying and correcting potential errors early on. In this article, we will explore the steps involved in integrating SwiftLint into your development environment and how to use it effectively.
How it works
SwiftLint hooks into Clang and SourceKit to use the AST representation of your source files for more accurate results. It is a tool for making your code clean and maybe avoiding bugs.
In essence, SwiftLint is a tool that executes source code and adheres to the generally accepted guidelines of the Swift programming language. The Ray Wanderlich’s Swift Style Guide is one of the popular style guides in the ios community for swift lint.
Integrating SwiftLint
Integrating swiftlint into your ios project is a matter of installing it locally, adding it to your project’s xcode build phase and configuring the rules in a swiftlint.yml file.
Installing Swiftlint Locally
There are many different ways to install swiftlint, you can check out the installation guide in Swiftlint’s github page. However i would recommend the homebrew approach.
Installation via HomeBrew
- $ brew install swiftlint
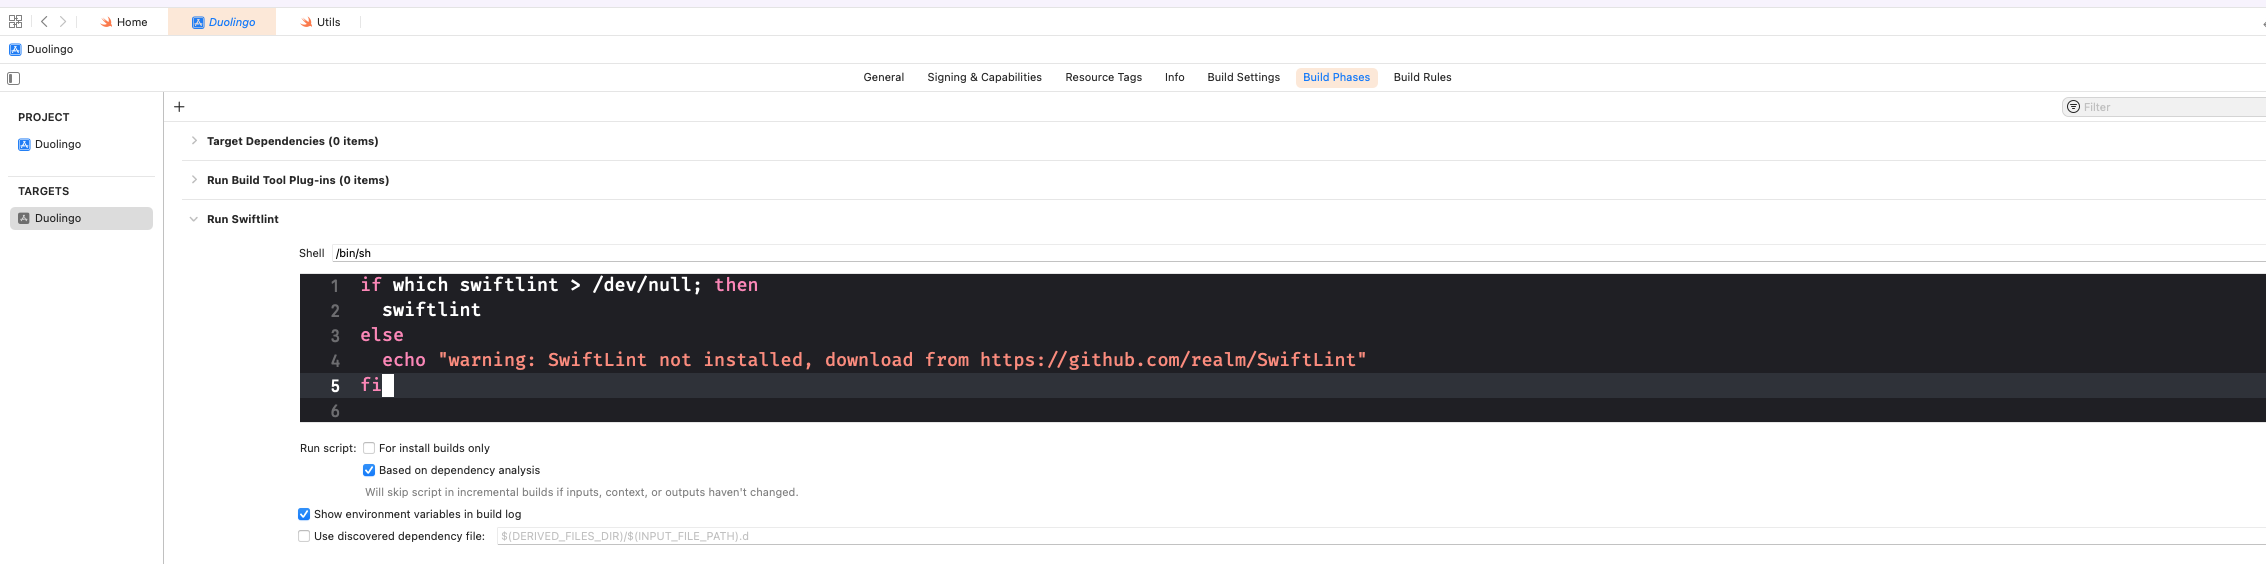
Integrating Swiftlint to your project’s build phase
There are two ways we can run swiftlint on our code. First approach is by simply running the command in the terminal, and the second one is by adding a build phase script to our ios project. I prefer the latter for it’s simplicity, since all we have to do to lint our code is to just tap the ⌘ + B keys.
Intel Chip
1
2
3
4
5
if which swiftlint > /dev/null; then
  swiftlint
else
  echo "warning: SwiftLint not installed, download from https://github.com/realm/SwiftLint"
fi
M1 Chip
If you installed SwiftLint via Homebrew on Apple Silicon, you will need to use this script for your build phase
1
2
3
4
5
6
export PATH="$PATH:/opt/homebrew/bin"
if which swiftlint > /dev/null; then
  swiftlint
else
  echo "warning: SwiftLint not installed, download from https://github.com/realm/SwiftLint"
fi
because Homebrew on Apple Silicon installs the binaries into the /opt/homebrew/bin folder by default. The export PATH is to instruct Xcode where to find SwiftLint.
Integration Process
Ok with that done we’ve successfully integrated SwiftLint into our project. To verify everything is working good, build your application by tapping ⌘ + B keys and you should see lots of lint related warnings/errors in your project.
That’s it, you now have SwiftLint in your project locally. The advantage of SwiftLint is that we can use it to fix certain violations by running the swiftlint --fix command on your project’s root directory in the terminal. Or, you can even have the fix command added as an argument in your project’s build phase script. That way, any time you build your app, SwiftLint will autofix lint violations that it can fix for you. Here’s what that build phase script would look like:
1
2
3
4
5
if which swiftlint > /dev/null; then
  swiftlint --fix && swiftlint
else
  echo "warning: SwiftLint not installed, download from https://github.com/realm/SwiftLint"
fi
Configuring Swiftlint
We can chose to opt in or out of certain swiftlint rules, thanks to the .swiftlint.yml file.
Create a .swiftlint.yml file and place it under root directory of your project.
You can create a swiftlint configuration file with the following command:
1
2
$ touch .swiftlint.yml
$ open .swiftlint.yml
Here is a sample of a .swiftlint.yml configuration file based on the official SwiftLint documentation. Here are more rules.
1
2
3
4
5
6
7
8
9
10
11
12
13
14
15
16
17
18
19
20
21
22
23
24
25
26
27
28
29
30
disabled_rules:
   - trailing_whitespace
opt_in_rules:
   - empty_count
   - empty_string
excluded:
   - Carthage
   - Pods
line_length:
    warning: 150
    error: 200
    ignores_function_declarations: true
    ignores_comments: true
    ignores_urls: truefunction_body_length:
    warning: 300
    error: 500
function_parameter_count:
    warning: 6
    error: 8
type_body_length:
    warning: 300
    error: 500
file_length:
    warning: 1000
    error: 1500
    ignore_comment_only_lines: true
cyclomatic_complexity:
    warning: 15
    error: 25
reporter: "xcode"
Running Swiftlint as Pre-push hook
Incorporating SwiftLint as a pre-push hook is a valuable consideration, especially when working in a larger team. This automation will ensure that your code passes the lint check before pushing to the remote branch, preventing the submission of unlinted code. Here’s a sample pre-push Git hook for your reference:
1
2
3
4
5
6
7
8
9
10
11
12
13
14
15
16
17
18
19
20
21
#!/bin/sh

echo "Running swiftlint script"

# Check if SwiftLint is installed
if ! command -v swiftlint &>/dev/null; then
  echo "SwiftLint not installed, please install SwiftLint and try again."
  exit 1
fi

# Run SwiftLint
swiftlint lint --strict
if [ $? -ne 0 ]; then
  echo "SwiftLint found lint violations. Please fix them before pushing to the remote branch."
  exit 1
fi

# Continue with the push if SwiftLint passed
echo "SwiftLint check passed. Continuing with the push."
exit 0
You can save this script in the .git/hooks/pre-push file in your project’s root directory, make sure it’s executable. From then on, the hook will run SwiftLint before every push to the remote branch and prevent pushing if any violations are found.
Bonus: Adding Swiftlint as CircleCI job
Adding swiftlint as a part of your circleci workflow is not a bad idea, considering how easy it is to let the ci handle lint violations for us. Here is a sample circle ci job that lints swift code:
1
2
3
4
5
6
7
8
9
10
11
12
13
14
15
16
17
18
19
20
21
22
23
24
25
26
version: 2.1
orbs:
  macos: circleci/macos@2.3.4

# Jobs that are ran in the workflows defined below.
jobs:
# Runs Swiftlint on swift files in the iOS dir
  run-swiftlint:
    macos:
      xcode: '14.0.0'
    steps:
      - checkout
      - run:
          name: Installing Swiftlint
          command: brew install swiftlint
      - run:
          name: Running Swiftlint
          command: swiftlint lint --strict --config .swiftlint.yml

  workflows:
  version: 2.1

  swiftlint-workflow:
    jobs:
      - run-swiftlint
Add this to your .circleci/config.yml
Thank you for reading ✌️