In today’s fast-paced world, users crave flexibility and the ability to multitask effortlessly. Imagine a scenario where your iOS app allows users to continue watching their favorite videos while browsing through other content or checking their emails. Enter Picture-in-Picture (PiP), a powerful functionality that empowers users to maintain an uninterrupted video experience while engaging in various activities on their devices. In this article, we’ll explore how to integrate Picture-in-Picture into your iOS app using Swift, unlocking a world of enhanced user experience and seamless multitasking. Get ready to captivate your users and provide them with the ultimate convenience they deserve. Let’s dive in!
First Things First
To implement PiP functionality in our app, we’ll need to set up and enable our app to access background mode capabilities. Don’t worry it’s pretty simple, heres how:
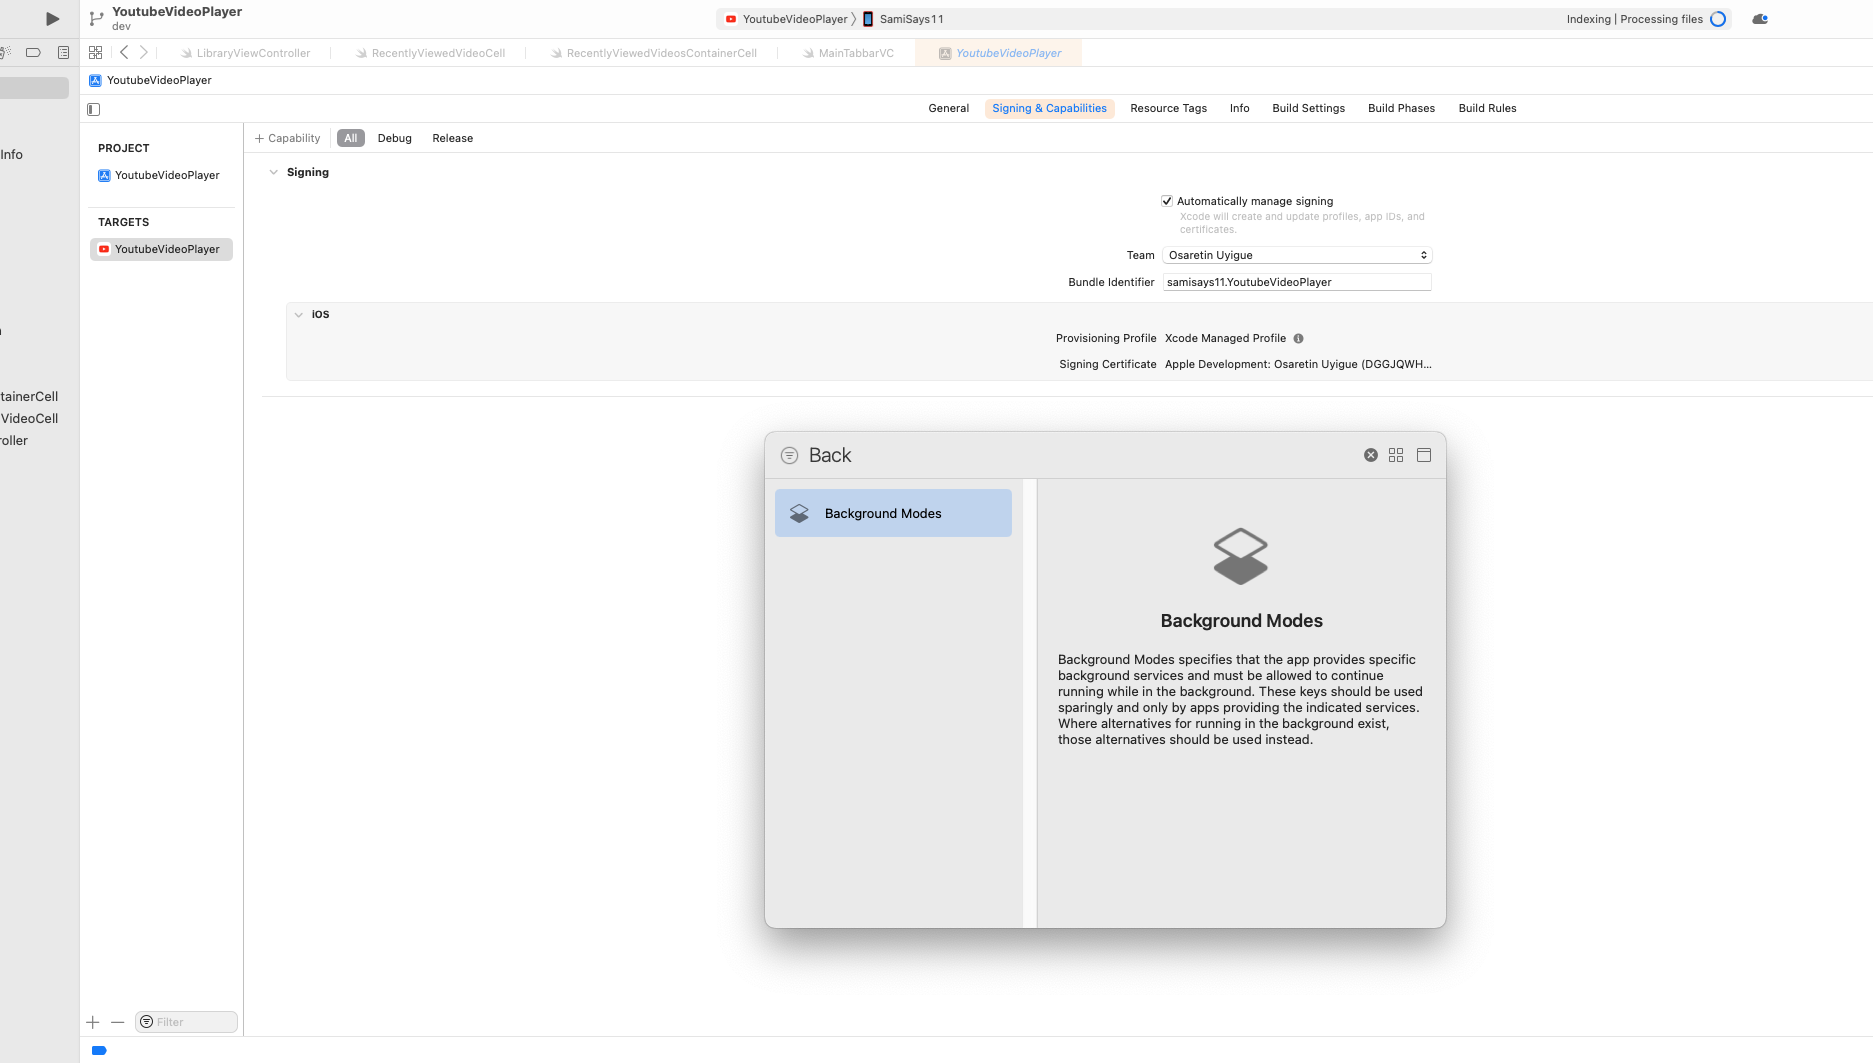
Step 1: Add Background Mode Capability to your app
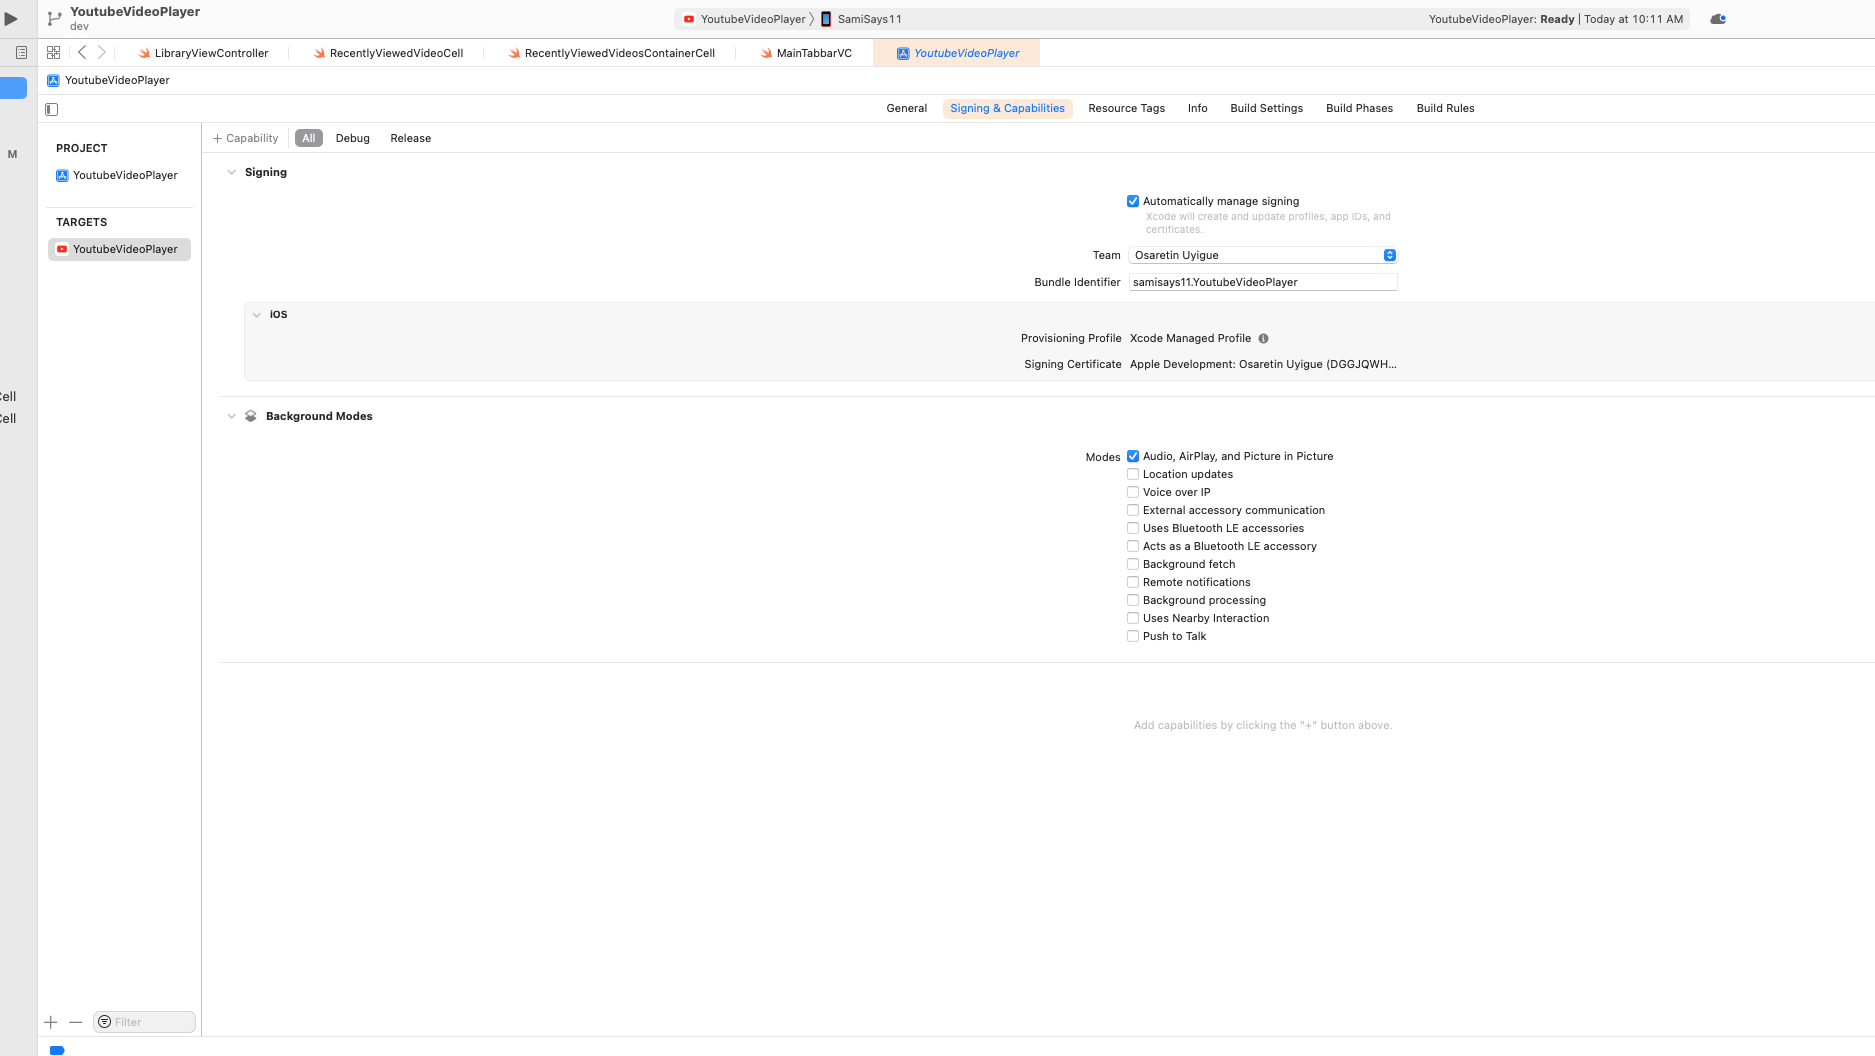
The first step is to add the Background Mode capability and then turn on the Audio, AirPlay, and Picture in Picture flag in xcode GUI under the Signing & Capabilities section. Here is what it would look like when you’re done
Adding Background Mode to your xcode Project
Toggle on the Audio, AirPlay, and Picture in Picture flag in xcode
Step 2: Request for background mode playback access
The second step is to setup the AVAudioSession.sharedInstance() category before the VideoPlayer is instantiated. An ideal place for this in a UIKit app would be in the appDelegate like below, or in your WindowGroup for SwiftUI apps. Really doesn’t matter, the point is so long as we set the AVAudioSession.sharedInstance() category to playback before we init our video player we will be fine.
1
2
3
4
5
6
7
8
9
10
11
12
13
func application(_ application: UIApplication, didFinishLaunchingWithOptions launchOptions: [UIApplication.LaunchOptionsKey: Any]?) -> Bool {
        requestPIPBackgroundMode()
        return true
    }

    private func requestPIPBackgroundMode() {
        let session = AVAudioSession.sharedInstance()
        do {
            try session.setCategory(.playback, mode: .moviePlayback)
        } catch let error {
            print(error.localizedDescription)
        }
    }
How Do We Do It
To implement PiP functionality in our app, we’ll leverage the power of AVKit and AVFoundation frameworks. AVKit provides a comprehensive set of tools and components specifically designed for media playback, while AVFoundation offers the underlying functionality for working with audiovisual media. With both frameworks, we can create an AVPlayerViewController instance and associate it with the desired video content that we want to enable PiP for or we can even create our own custom video player with the help of the AVPlayer API.
Setting Up PiP in UIKit
The AVPlayerViewController class not only simplifies the process of playing videos but also provides built-in support for PiP functionality. With just a few lines of code, we can present the AVPlayerViewController to our users, allowing them to start watching videos seamlessly within our app. Remember to ensure that you have properly imported the AVKit and AVFoundation frameworks into the file else xcode will yell at you.
1
2
3
4
5
6
7
8
// In UIKIT

let playerViewController = AVPlayerViewController()
let videoURL = URL(string: "your_video_url_here")
let player = AVPlayer(url: videoURL!)
playerViewController.player = player
playerViewController.canStartPictureInPictureAutomaticallyFromInline = true
present(playerViewController, animated: true)
Setting the canStartPictureInPictureAutomaticallyFromInline option to true we are basically telling our video player to automatically start PiP when the app transitions to background mode.
Once the AVPlayerViewController is presented, we can enable PiP functionality by setting the appropriate delegate and implementing the necessary delegate methods. The AVPlayerViewControllerDelegate protocol provides us with hooks into the PiP lifecycle events, enabling us to respond to PiP-related actions and customize the behavior of our app accordingly.
1
2
3
4
5
6
7
8
// PiP LifeCycle Dlegates
func playerViewControllerWillStartPictureInPicture(_ playerViewController: AVPlayerViewController)

func playerViewControllerDidStartPictureInPicture(_ playerViewController: AVPlayerViewController)

func playerViewControllerWillStopPictureInPicture(_ playerViewController: AVPlayerViewController)

func playerViewControllerDidStopPictureInPicture(_ playerViewController: AVPlayerViewController)
Ok here’s what your full code should look like when you are done.
1
2
3
4
5
6
7
8
9
10
11
12
13
14
15
16
17
18
19
20
21
22
23
24
25
26
27
28
29
30
31
32
33
34
35
36
37
38
39
40
41
42
43
44
45
46
47
import UIKit
import AVKit

class ViewController: UIViewController, AVPlayerViewControllerDelegate {

    var playerViewController: AVPlayerViewController()

    override func viewDidLoad() {
        super.viewDidLoad()
        setupPlayer()
    }

    func setupPlayer() {
        let videoURL = URL(string: "your_video_url_here")
        let player = AVPlayer(url: videoURL!)
        playerViewController.delegate = self
        playerViewController.player = player
        playerViewController.canStartPictureInPictureAutomaticallyFromInline = true
        playerViewController.player?.play()
        present(playerViewController, animated: true)
    }

    // AVPlayerViewControllerDelegate methods
    func playerViewControllerWillStartPictureInPicture(_ playerViewController: AVPlayerViewController) {
        // Perform any necessary actions when PiP starts
    }

    func playerViewControllerDidStartPictureInPicture(_ playerViewController: AVPlayerViewController) {
        // Perform any necessary actions when PiP has started
    }

    func playerViewControllerWillStopPictureInPicture(_ playerViewController: AVPlayerViewController) {
        // Perform any necessary actions when PiP is about to stop
    }

    func playerViewControllerDidStopPictureInPicture(_ playerViewController: AVPlayerViewController) {
        // Perform any necessary actions when PiP has stopped
    }

    override func viewWillDisappear(_ animated: Bool) {
        super.viewWillDisappear(animated)

        // Stop the video playback when the view disappears
        playerViewController.player?.pause()
    }
}
Setting Up PiP in SwiftUI
Although SwiftUI provides us with a neat media player API called VideoPlayer, unfortunately it doesn’t provide a PiP support straight out of the box like the UIKit equivalent does. So with anything else when SwiftUI falls short we have to dip back down to UIKit to do it the old imperative way but thanks to the help our homies UIViewRepresentable and UIViewControllerRepresentable it’s not as difficult to accomplish. Let’s see how we can leverage a UIKit native PiP support to add the functionality to a SwiftUI app.
1
2
3
4
5
6
7
8
9
10
11
12
13
14
15
16
17
18
19
20
21
22
23
24
25
26
27
28
29
30
31
32
33
34
35
36
37
import SwiftUI
import AVKit
struct AVVideoPlayer: UIViewControllerRepresentable {

    func makeUIViewController(context: Context) -> AVPlayerViewController {
        let playerViewController = AVPlayerViewController()
        let videoUrlString = "https://player.vimeo.com/external/291648067.sd.mp4?s=7f9ee1f8ec1e5376027e4a6d1d05d5738b2fbb29&profile_id=164&oauth2_token_id=57447761"
        let videoURL = URL(string: videoUrlString)
        let player = AVPlayer(url: videoURL!)
        playerViewController.player = player
        playerViewController.canStartPictureInPictureAutomaticallyFromInline = true
        playerViewController.player?.play()
        return playerViewController
    }

    func updateUIViewController(_ uiViewController: AVPlayerViewController, context: Context) { }
}


struct VideoPlayerContainerView: View {
    var body: some View {
        VStack {
            AVVideoPlayer()
                .frame(width: UIScreen.main.bounds.width, height:  UIScreen.main.bounds.width)

            Spacer()
        }
        .ignoresSafeArea()
    }
}

struct VideoPlayerContainerViewProvider_Previews: PreviewProvider {
    static var previews: some View {
        VideoPlayerContainerView()
    }
}
What’s Going on
The AVVideoPlayer is a UIViewControllerRepresentable that allows us to create and embed a AVPlayerViewController into our SwiftUI view called VideoPlayerContainerView. It’s really as simple as that.
That’s it! By following these steps, you can integrate Picture-in-Picture functionality into your iOS app. I’m sure your Users will enjoy the flexibility and convenience of multitasking while enjoying their favorite videos.