In the fast-paced world of iOS development, staying ahead of the curve is not just about writing great code—it’s also about automating anything that’s automatable in your development process, especially when you work on a team.
If you’re a solo dev YOLOing your side projects, you can probably get away with doing a lot of things manually without really automating anything. But in a team setting, iOS development mirrors a lot of the more traditional software development best practices you will see in other software engineering communities.
Enter Continuous Integration (CI), a practice that transforms the way we build, test, and deploy our iOS apps. In this article, I will walk you through how we can use GitHub Actions to create a decent CI pipeline for your iOS app.
Why CI Matters for iOS Development
Picture this: You’re working on an exciting new feature for your iOS app. You’ve been coding for hours, and finally, you’re ready to merge your changes. But wait—how can you be sure your changes won’t break the existing functionality? What if there are conflicts with other team mates work? This is where Continuous Integration shines.
CI is the practice of automatically integrating code changes from multiple contributors into a shared repository, multiple times a day. For us iOS developers, this means automatically building our app, running unit tests, and even deploying to TestFlight or the App Store—all triggered by a simple git push.
By implementing CI, we can:
- Catch bugs early
- Ensure code quality
- Save time on manual testing
- Automate some part of our release process
And the best part? With GitHub Actions, setting up a CI pipeline is pretty easy. You’re probably already using GitHub to host your code anyway, so I’m assuming you’re already familiar with the platform.
Understanding GitHub Actions
Before we dive into the nitty-gritty of setting up our CI pipeline, let’s take a moment to appreciate what GitHub Actions brings to the table.
GitHub Actions is a CI/CD (Continuous Integration/Continuous Deployment) platform that allows you to automate your software workflow right from your GitHub repo. We can setup these automated workflows that springs into action every time we push up changes, create an PR or even make a commit.
The magic of GitHub Actions lies in its workflow files. These are YAML files (we’ll explain what YAML is in a moment) that live in your repo and defines the steps GitHub should take when certain events occur—like for example when you push up a code or when you create a pull request.
What’s YAML, Anyway?
YAML (YAML Ain’t Markup Language) is a human-friendly data serialization standard. In simpler terms, it’s a way for us to write these configuration files that are easy for both humans and machines to read. If you’ve worked with JSON, think of YAML as its more readable cousin.
Here’s a quick example to illustrate the syntax:
1
2
3
4
5
6
7
name: John Doe
age: 30
occupation: iOS Developer
skills:
  - Swift
  - Objective-C
  - SwiftUI
See how intuitive that is? This readability makes YAML perfect for defining complex workflows in a way that’s easy for us to understand and maintain. Ok enough yapping, let’s go setup the main thing we are here for.
Setting Up Your iOS CI Pipeline: Step-by-Step
We’ve covered the basics, now let’s create a CI pipeline for our iOS app using GitHub Actions. We’ll break this down into manageable steps, and i will do my best to explain each step in detail.
Step 1: Preparing Your Repository
First things first, make sure your iOS project is pushed to a GitHub repository. If you haven’t done this yet, now’s the perfect time!
Once your code is on GitHub, you’ll need to create a new directory in your local project’s root directory (a.k.a. folder) called .github/workflows. This is where we’ll store our workflow file.
You can do this via the CLI:
1
mkdir -p .github/workflows
Or, if you’re not a fan of the terminal, you can just right-click and create a new folder the old-fashioned way. No judgment here!
Either way, make sure you end up with a folder named .github/workflows in your iOS project’s root folder. This is crucial for the next steps, so double-check it’s there!
 you should have a .github folder with a workflows folder in it, in the root folder of your iOS project
Step 2: Creating Your Workflow File
In the .github/workflows directory, let’s create a new file named ios.yml. This YAML file will define our entire CI pipeline.
Let’s start with a basic structure:
1
2
3
4
5
6
7
8
9
10
11
12
13
14
name: iOS CI

on:
  push:
    branches: [main]
  pull_request:
    branches: [main]

jobs:
  build:
    runs-on: macos-latest

    steps:
    # We'll fill these in next!
Ok what does all of these gibberish even mean?
Let’s break it down:
name: This is the name of our workflow. It’ll appear in the GitHub Actions tab of your repository.
on: This is our workflow’s trigger. This section specifies when the workflow should run. In this case, it’ll run on pushes or pull requests to the main branch.
jobs: This is where we define the actual work to be done. We have one job called build. Remember, you can call it anything you want, so long as it’s descriptive of the task you want it to perform. And each job has steps, which are just, well, the steps it needs to take to complete its task. I think that’s pretty self-explanatory.
runs-on: This specifies the type of machine to run the job on. We’re using macos-latest because we need a Mac environment to build iOS apps.
Step 3: Defining the Build Steps
Now, let’s fill in the steps for our build job. We’ll add steps to check out the code from github, set up Xcode, build the app, and then run the tests.
1
2
3
4
5
6
7
8
9
10
11
12
13
14
15
16
17
18
19
20
21
22
23
name: iOS CI

on:
  push:
    branches: [main]
  pull_request:
    branches: [main]

jobs:
  build:
    runs-on: macos-latest

    steps:
      - uses: actions/checkout@v4

      - name: Select Xcode
        run: sudo xcode-select -switch /Applications/Xcode.app

      - name: Build
        run: xcodebuild clean build -project YourProject.xcodeproj -scheme YourScheme -destination 'platform=iOS Simulator,name=iPhone 15'

      - name: Run tests
        run: xcodebuild test -project YourProject.xcodeproj -scheme YourScheme -destination 'platform=iOS Simulator,name=iPhone 15'
Ok Let’s examine what each step does:
uses: actions/checkout@v4: This action checks out our repository in github, so the workflow can access it.
Select Xcode: This step ensures we’re using the correct version of Xcode.
Build: This step builds your project using xcodebuild. Make sure to replace YourProject.xcodeproj and YourScheme with your actual project and scheme names.
Run tests: This step runs our project’s tests, again using xcodebuild.
If you’re new to xcodebuild and you’re curious about what it does, please check out this article i wrote a while ago, it’s fairly straightforward and gives you the TLDR of it.
Step 4: Improving Your Workflow
While the above workflow is functional, we can make it even better. Let’s add some significant improvement to it:
1
2
3
4
5
6
7
8
9
10
11
12
13
14
15
16
17
18
19
20
21
22
23
24
25
26
27
28
29
30
31
32
33
34
35
36
37
38
name: iOS CI

on:
  push:
    branches: [main]
  pull_request:
    branches: [main]

jobs:
  build:
    runs-on: macos-latest

    steps:
      - uses: actions/checkout@v4

      - name: Cache Swift packages
        uses: actions/cache@v4
        with:
          path: .build
          key: $-spm-$
          restore-keys: |
            $-spm-

      - name: Select Xcode
        run: sudo xcode-select -switch /Applications/Xcode.app

      - name: Build
        run: xcodebuild clean build -project YourProject.xcodeproj -scheme YourScheme -destination 'platform=iOS Simulator,name=iPhone 12'

      - name: Run tests
        run: xcodebuild test -project YourProject.xcodeproj -scheme YourScheme -destination 'platform=iOS Simulator,name=iPhone 12'

      - name: Upload test results
        uses: actions/upload-artifact@v4
        if: failure()
        with:
          name: test-results
          path: path/to/test/results
Ok so What’s new here?
Well, We’ve added a step to cache Swift packages. This will significantly speed up subsequent builds by reusing previously downloaded dependencies. We’ve also added a step to upload test results as an artifact if the tests fail. This makes it easier to diagnose issues.
Wrapping Up
Alright folks, we’ve covered a lot of ground here! Let’s take a moment to recap the key components of our GitHub Actions workflow. Understanding these elements will help you craft good CI pipelines for your iOS projects.
The Building Blocks of a GitHub Actions Workflow
-
Workflow File: This is your
.ymlfile living in the.github/workflowsdirectory. It’s the blueprint for your entire CI process. -
Jobs: These are the main units of work in your workflow. In our example, we had a single job called
build, but in the real world, you can and most likely will have multiple jobs for different tasks like testing, deploying, or even notifying your team. -
Steps: These are the individual actions within a job. Each step is a separate task, like checking out our code, setting up Xcode, or running our unit tests.
-
Runs-on: This specifies the type of machine the job will run on. For iOS, we typically use
macos-latestto ensure we have the necessary environment. -
Actions: These are reusable units of code. Think of them as pre-packaged scripts or programs that you can easily incorporate into your workflow. We used actions like
actions/checkout@v4to clone our repository andactions/cache@v4to speed up our builds by caching dependencies. At the end of the day, we don’t want to reinvent the wheel for common tasks others have already written code for. -
Artifacts: These are files produced during the workflow run. We used them to upload test results, which can be incredibly helpful for debugging failed runs.
Time to See It in Action!
Now that we’ve set up our workflow, it’s time for the moment of truth. Don’t forget to commit your changes and push them up to GitHub. Here’s a quick reminder of how to do that:
1
2
3
git add .
git commit -m "Add GitHub Actions workflow for iOS CI"
git push origin main
Once you’ve pushed your changes, head over to your GitHub repository and click on the “Actions” tab. You should see your workflow kicking off like a champ! It’s pretty cool to watch your code being built and tested automatically, right?
Here is what mine looks like, as you can see we have our iOS CI workflow there:
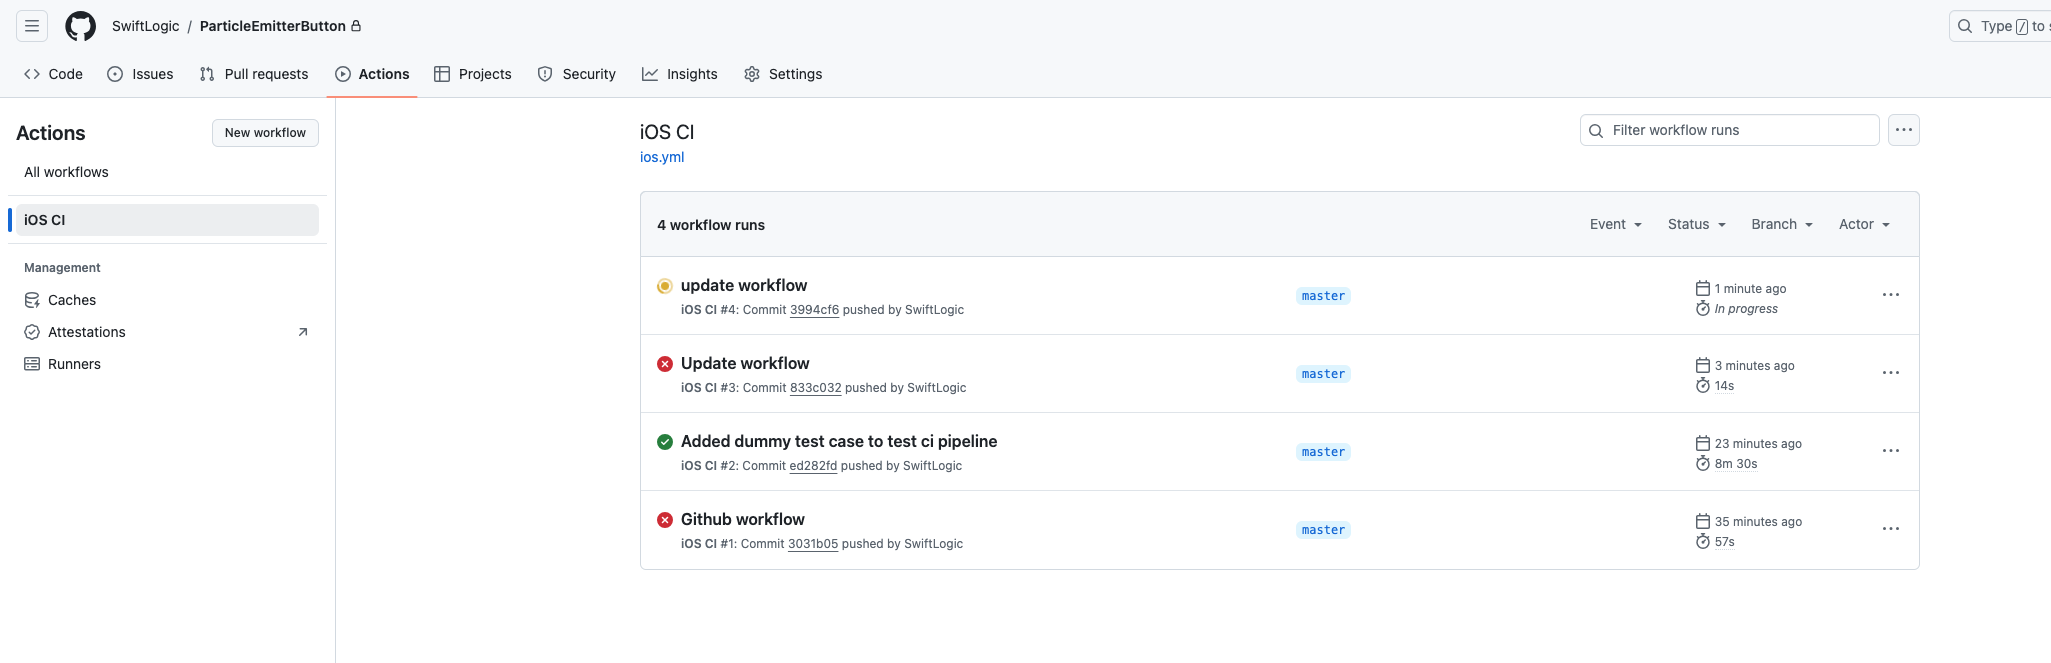 github actions page overview
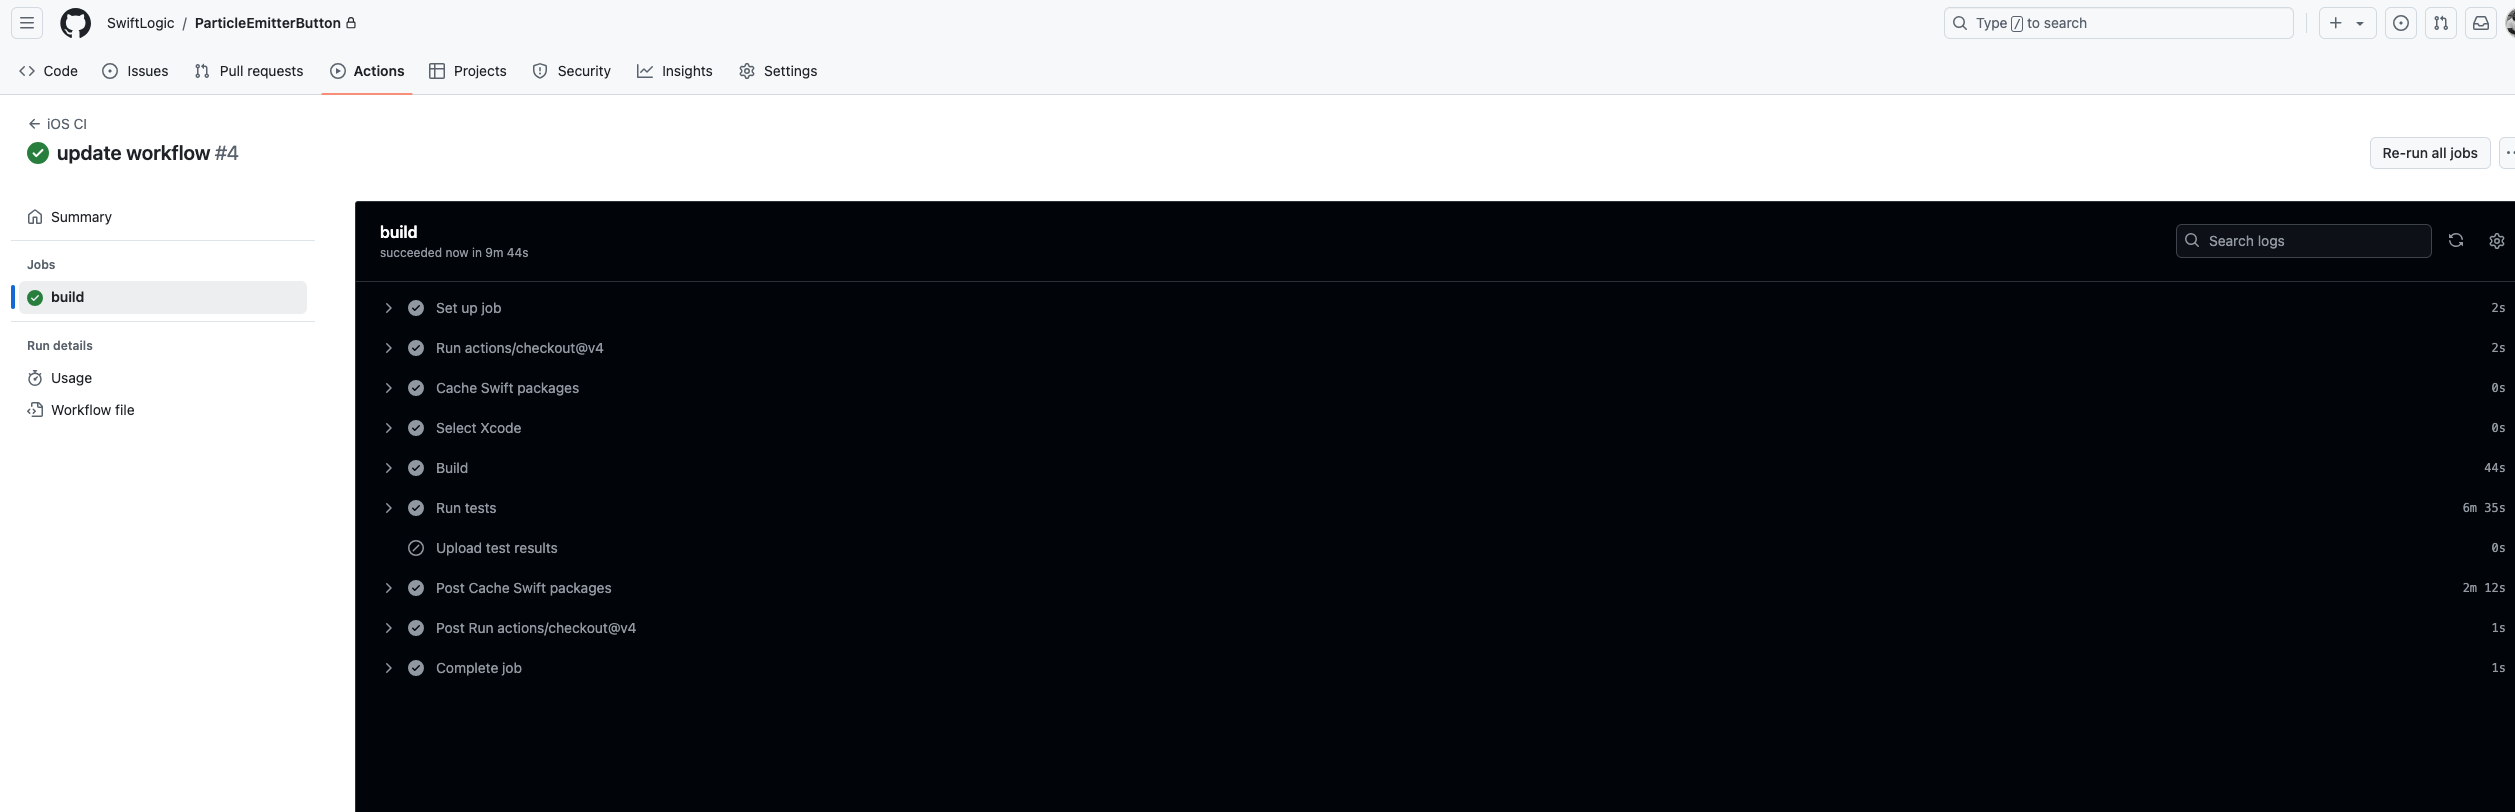 What a successful run looks like
Take a moment to explore the Actions tab. You can see each run of your workflow, examine the logs for each step, and even download any artifacts that were generated.
Remember, the power of CI isn’t just in catching bugs early—it’s all about freeing up your time to focus on what really matters: building amazing iOS apps that delight your users.
If you derived value from this article, please follow me on: Github & Youtube for more awesome tutorials and swift resources.
Thanks for reading and Happy coding! 🚀📱