Prior to iOS 14, the quickest and simplest way to fetch photos from the user’s photo library was through the UIImagePickerController class. However, starting from iOS 14.0, Apple is providing us developers a new way to access the user’s photo library using the new PHPickerViewController class. A reusable class built on top of the PhotosUI framework rather than UIKit. It makes photo and video selection a much modern experience for apps.
Why Even Use PHPickerViewController?
Unless your app still supports anything below iOS 14, dumping the old guard of UIImagePickerController should be very easy when you consider some of the disadvantages that came with the old guy.
The old UIImagePickerController was fairly basic and limited. It had no search or filtering functionality and did not support multi-item selection. Although the UIImagePickerController class is not currently deprecated, if you look at the header file you’ll see the API marked with this:
1
2
API_DEPRECATED("Will be removed in a future release, use PHPicker.", ios(11, API_TO_BE_DEPRECATED));
So expect deprecation in future updates.
What’s the Buzz
Here’s a list of why PHPickerViewController is awesome
- No more permission alerts. Developer don’t have to specify the Privacy - Photo Library Usage Description key in the info.plist file anymore, because there won’t be any need for alert views that’s asking for permission.
- Runs in a separate process. Although the PHPickerViewController might appear to be present inside the host app, it runs in a separate process.
- Built-in privacy. Since PHPickerViewController runs in a separate process, only the content selected by the user is shared with the Host App. Unlike the UIImagePickerViewController, you can’t programmatically take a screenshot of this picker view or access any content that’s not selected by the user.
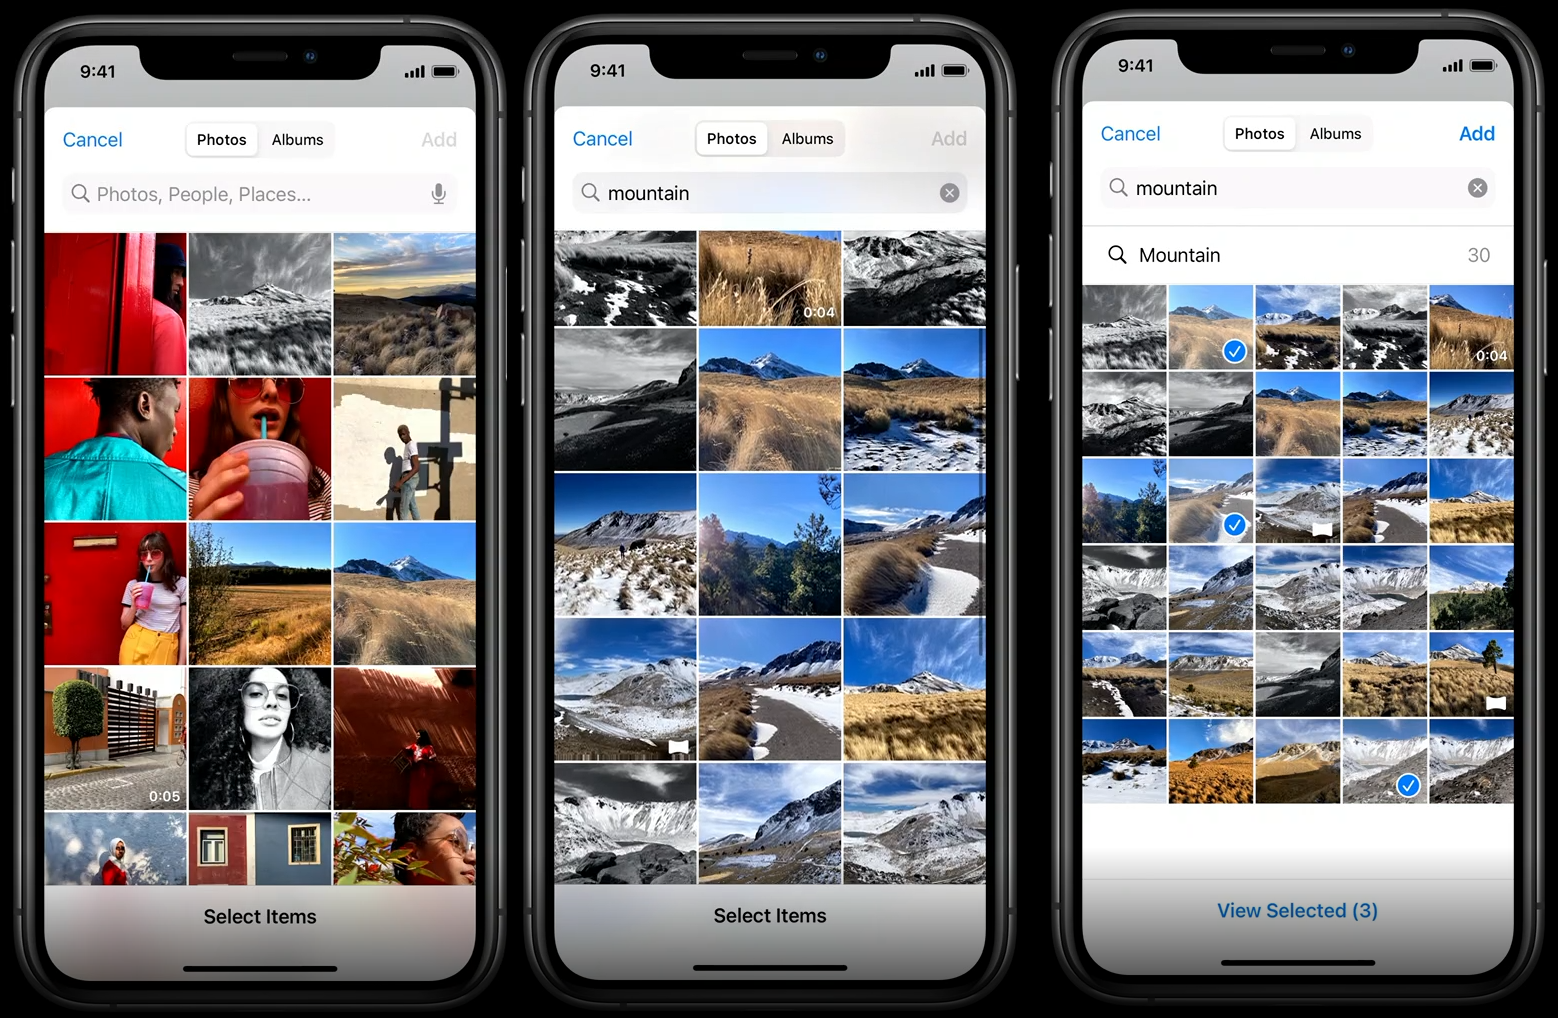
- Built-in search. Searching photos is a built-in feature in PHPickerViewController, and the UI is similar to that of the Photos app.
- Multi-selection. PHPickerViewController comes equiped with multi-selection capabilty and also allows the developer to limit the number of photos a user can select by setting the selectionLimit property in PHPickerConfiguration.
Implementing PHPickerViewController
Getting started with the new PHPickerViewController API is pretty straightforward. It requires a configuration and uses the traditional delegate model to alert’s us when item selection is complete.
The PHPickerViewController takes an instance of PHPickerConfiguration as an initializer argument.
1
2
     var configuration = PHPickerConfiguration()
     let picker = PHPickerViewController(configuration: configuration)
PHPickerConfiguration
The PHPickerConfiguration provides us with three properties we can use to customize the PHPickerViewController.
-
selectionLimit - This property specifies the number of items a user can select. The default value is 1, while the value 0 specifies unlimited selection. The below configuration limits the selection to 10 items.
-
filter - This property restricts the type of items that can be displayed (images, livePhotos or videos). Setting the value to nil will display all the supported items. The below configuration displays only the live photos and images.
-
preferredAssetRepresentationMode - This determines how an item provider should represent an asset. The default value is automatic. The below configuration sets the asset’s representation mode to automatic.
Note: By default the selectionLimit is set to 1, and there is no filter.
1
2
3
4
5
6
7
8
9
10
// remember to import PhotosUI

        var configuration = PHPickerConfiguration()
        configuration.selectionLimit = 10
        configuration.filter = .any(of: [.images,.livePhotos])
        configuration.preferredAssetRepresentationMode = .automatic
        let picker = PHPickerViewController(configuration: configuration)
        picker.delegate = self
        present(picker, animated: true, completion: nil)
PHPickerViewControllerDelegate
Accessing selected items from the PHPickerViewController is simply a matter of implementing the PHPickerViewControllerDelegate , which has just one method:
picker’s didFinishPicking method
1
2
3
 func picker(_ picker: PHPickerViewController, didFinishPicking results: [PHPickerResult]) {

 }
The method comes with a result object which is an array of type PHPickerResult which contains an object of NSItemProvider. Now let’s see how we can parse selected images from this item provider object.
Parsing Selected Images from ItemProvider
1
2
3
4
5
6
7
8
9
10
11
12
13
14
15
16
17
18
19
20
21
22
23
24
25
26
27

func picker(_ picker: PHPickerViewController, didFinishPicking results: [PHPickerResult]) {

    // Please note that your app is responsible for the presentation and dismissal of the picker. The picker does not manage the display itself.
    dismiss(animated: true, completion: nil)
    guard !results.isEmpty else { return }

    for result in results {

        let itemProvider = result.itemProvider

        if itemProvider.canLoadObject(ofClass: UIImage.self) {

            itemProvider.loadObject(ofClass: UIImage.self) { (image, error) in

                DispatchQueue.main.async {

                    if let image = image as? UIImage {

                        // WE NOW HAVE THE UIIMAGE OBJECT
                    }
                }
            }
        }
    }
}
The for loop will go through all selected items in the returned results, and process all items by checking if the itemProvider can load a UIImage object.
Note: There is no support for automatic compression. The picker’s itemProvider will always return the original image with full dimensions. It’s up to the developer to perform necessary compressions or edition.
Parsing LivePhotos
Parsing live photos is quite similar to parsing images. The PhotosUI framework provides us with a PHLivePhoto object that can be used to load live photos from the itemProvider:
1
2
3
4
5
6
7
8
9
10
11
12
13
14
15
let itemProvider = result.itemProvider

if itemProvider.canLoadObject(ofClass: PHLivePhoto.self) {

   itemProvider.loadObject(ofClass: PHLivePhoto.self) { [weak self] livePhoto, error in

      DispatchQueue.main.async {

         if let livePhoto = livePhoto as? PHLivePhoto {
              // WE NOW HAVE ACCESS TO THE SELECTED LIVE PHOTO
            }
          }
       }
    }
Note: The PhotosUI framework provides us with a PHLivePhotoView class that we can use to display livePhotos.
Parsing Videos
Parsing videos is a little more work compared to photos and livePhotos.
First we check itemProvider for item that conforms to “public.movie” through a UTType.movie.identifier string. Then we use the itemProvider’s loadFileRepresentation(forTypeIdentifier: ) method to load and copy the video’s url.
1
2
3
4
5
6
7
8
9
10
11
12
13
14
15
16
17
18
19
20
21
22
23
24
25
26
27
 let movieTypeIdentifier = UTType.movie.identifier

    if itemProvider.hasItemConformingToTypeIdentifier(movieTypeIdentifier) {

        itemProvider.loadFileRepresentation(forTypeIdentifier: movieTypeIdentifier) {[weak self] url, error in
            guard error == nil else{
                print(error)
                return
            }

            // receiving the video-local-URL / filepath
            guard let url = url else {return}

            // create a new filename
            let fileName = "\(Int(Date().timeIntervalSince1970)).\(url.pathExtension)"

            // create new URL
            let storedVideoUrl = URL(fileURLWithPath: NSTemporaryDirectory() + fileName)

            // copy item to APP Storage
            try? FileManager.default.copyItem(at: url, to: storedVideoUrl)

            DispatchQueue.main.async {
                // WE NOW HAVE ACCESS TO OUR VIDEO'S URL in storedVideoUrl
            }
        }
    }
Final Tip
If your configuration’s filter allows the user to choose any type of asset — a video, a live photo, or a normal photo — you’re going to want to distinguish what type the user actually chose. This turns out to be no simple matter.
After a great deal of experimentation and reading around, I’ve settled on a formula like this:
1
2
3
4
5
6
7
8
// itemProvider is the PHPickerResult's itemProvider
    if itemProvider.hasItemConformingToTypeIdentifier(UTType.movie.identifier) {
        // it's a video
     } else if itemProvider.canLoadObject(ofClass: PHLivePhoto.self) {
        // it's a live photo
     } else if itemProvider.canLoadObject(ofClass: UIImage.self) {
        // it's a photo
    }
In that code, the order of the tests is deliberate. A live photo can be supplied in a simple UIImage representation, so if we test for images before live photos, we won’t learn that the result is a live photo.
Drawbacks
Although the PHPickerViewController offers a modern privacy-centric API that allows us to access photos and videos, It’s important to note that it currently does not offer any photo or video capturing capability. We still rely on it’s predecessor the UIImagePickerController for that.