What Are We Building ?
In this tutorial, i will walk you through how to build a clone of Instagram’s Story Photo Picker feature.
If you are not familiar with what that looks like there is a gif demo of it below. For clarity we will be focusing exclusively on the custom photo picker functionality. All the user-interface, gesture animations, and transition animation related code are in the Starter Project.
Dev Environment
Swift 5, iOS 14, Xcode 13.4.1
Dev Environment
Swift 5, iOS 14, Xcode 13.4.1 Project Demo
What You’ll Learn
Have you ever wondered how 3rd party apps like Instagram or Snapchat can access the photo library so seamlessly to retrieve and display our photos and albums in their custom made UIs? PhotoKit is the magical framework that makes that possible.
At the end of this tutorial you’ll know:
- How to Setup and Ask for User’s Photo Library Permission.
- How to Fetch Smart Albums and User-Created Albums.
- How to Fetch all Photo Assets in a Specific Album.
- How to Retrieve Images from Assets.
- How to use the retrieved PHAssets and PHAssetCollections to power our UI.
- How to use the PHPickerViewController to Search and Select specific Photo Assets.
- How to use the PHPhotoLibraryChangeObserver protocol to keep our assets up to date.

Getting Started
Like many privacy-centric iOS APIs, the PhotoKit requires us to request the user’s permission before we can access the user’s photo library. To get this permission, we use the PHPhotoLibrary, a shared object that manages access to the photo library.
Modifying Info.plist Before Requesting Authorization
Download the Starter Project and open the starter folder. Double click on the InstaPhotoPicker.xcodeproj file and navigate to the info.plist file in the root directory. The first step to Requesting Authorization is to add a key to the Info.plist file that explains why you need permission to access the user’s photo library. To do this you will need to:
- Open the Info.plist file.
- Right-click Information Property List and select the Add Row option. A new line will be displayed.
- Start typing Privacy - Photo Library Usage Description in the new row’s Key column and press enter.
- In the Value column, type in whatever usage description you want the alert dialog to show the user the first time iOS request for permission. For this tutorial we’ll just go with “Access to Photo Library Allows you to upload media from your Camera Roll to InstaPhotoPicker” as our request description.
Your Info.plist should look like this:

Requesting Authorization to Access User’s Photo Library
Open your ViewController.swift file in the starter project and add the following code inside your getPhotoPermission method in the Photokit section:
1
2
3
4
5
6
7
8
9
10
11
12
13
14
15
16
17
18
19
20
21
22
23
24
25
26
27
28
29
30
31
32
33
34
35
36
37
38
39
40
41
42
43
44
//MARK: - Photokit
 fileprivate func getPhotoPermission(completionHandler: @escaping(Bool) -> Void) {

        // 1
        guard PHPhotoLibrary.authorizationStatus() != .authorized else {
            completionHandler(true)
            return
        }

        // 2
        PHPhotoLibrary.requestAuthorization(for: .readWrite) { status in
            switch status {
            case .notDetermined:
                // The user hasn't determined this app's access.
                print("notDetermined")
                //                completionHandler(false)

            case .restricted:
                // The system restricted this app's access.
                print("restricted")
                completionHandler(false)

            case .denied:
                // The user explicitly denied this app's access.
                print("denied")
                completionHandler(false)

            case .authorized:
                // The user authorized this app to access Photos data.
                print("authorized")
                completionHandler(true)


            case .limited:
                // The user authorized this app for limited Photos access.
                print("limited")
                completionHandler(true)

            @unknown default:
                fatalError()
            }
        }
    }
-
This gets us the current authorization status from PHPhotoLibrary. If we’ve already been granted authorization from prior prompts, we call the completion handler with a value of true and return out of the method.
-
If authorization has not been previously granted or requested, we request it. When requesting authorization, iOS displays an alert that asks for user’s permission, upon user’s selection it passes back the user’s selection as a PHAuthorizationStatus object. We then call our completion handler and return true if the status (PHAuthorizationStatus) value is .authorized, or .limited, otherwise we return false.
Note: Prior to iOS 14 PHAuthorizationStatus enum, did not contain a .limited, or .restricted status options. This is something to keep in mind if you’re also building for iOS 13 and below.
Finalizing Authorization
Run the project, click on the Enable photo access button. On tap iOS will ask for permission to let InstaPhotoPicker access the photo library. If you are building for iOS 13 or less tap OK, on iOS 14 tap Allow Access to All Photos.
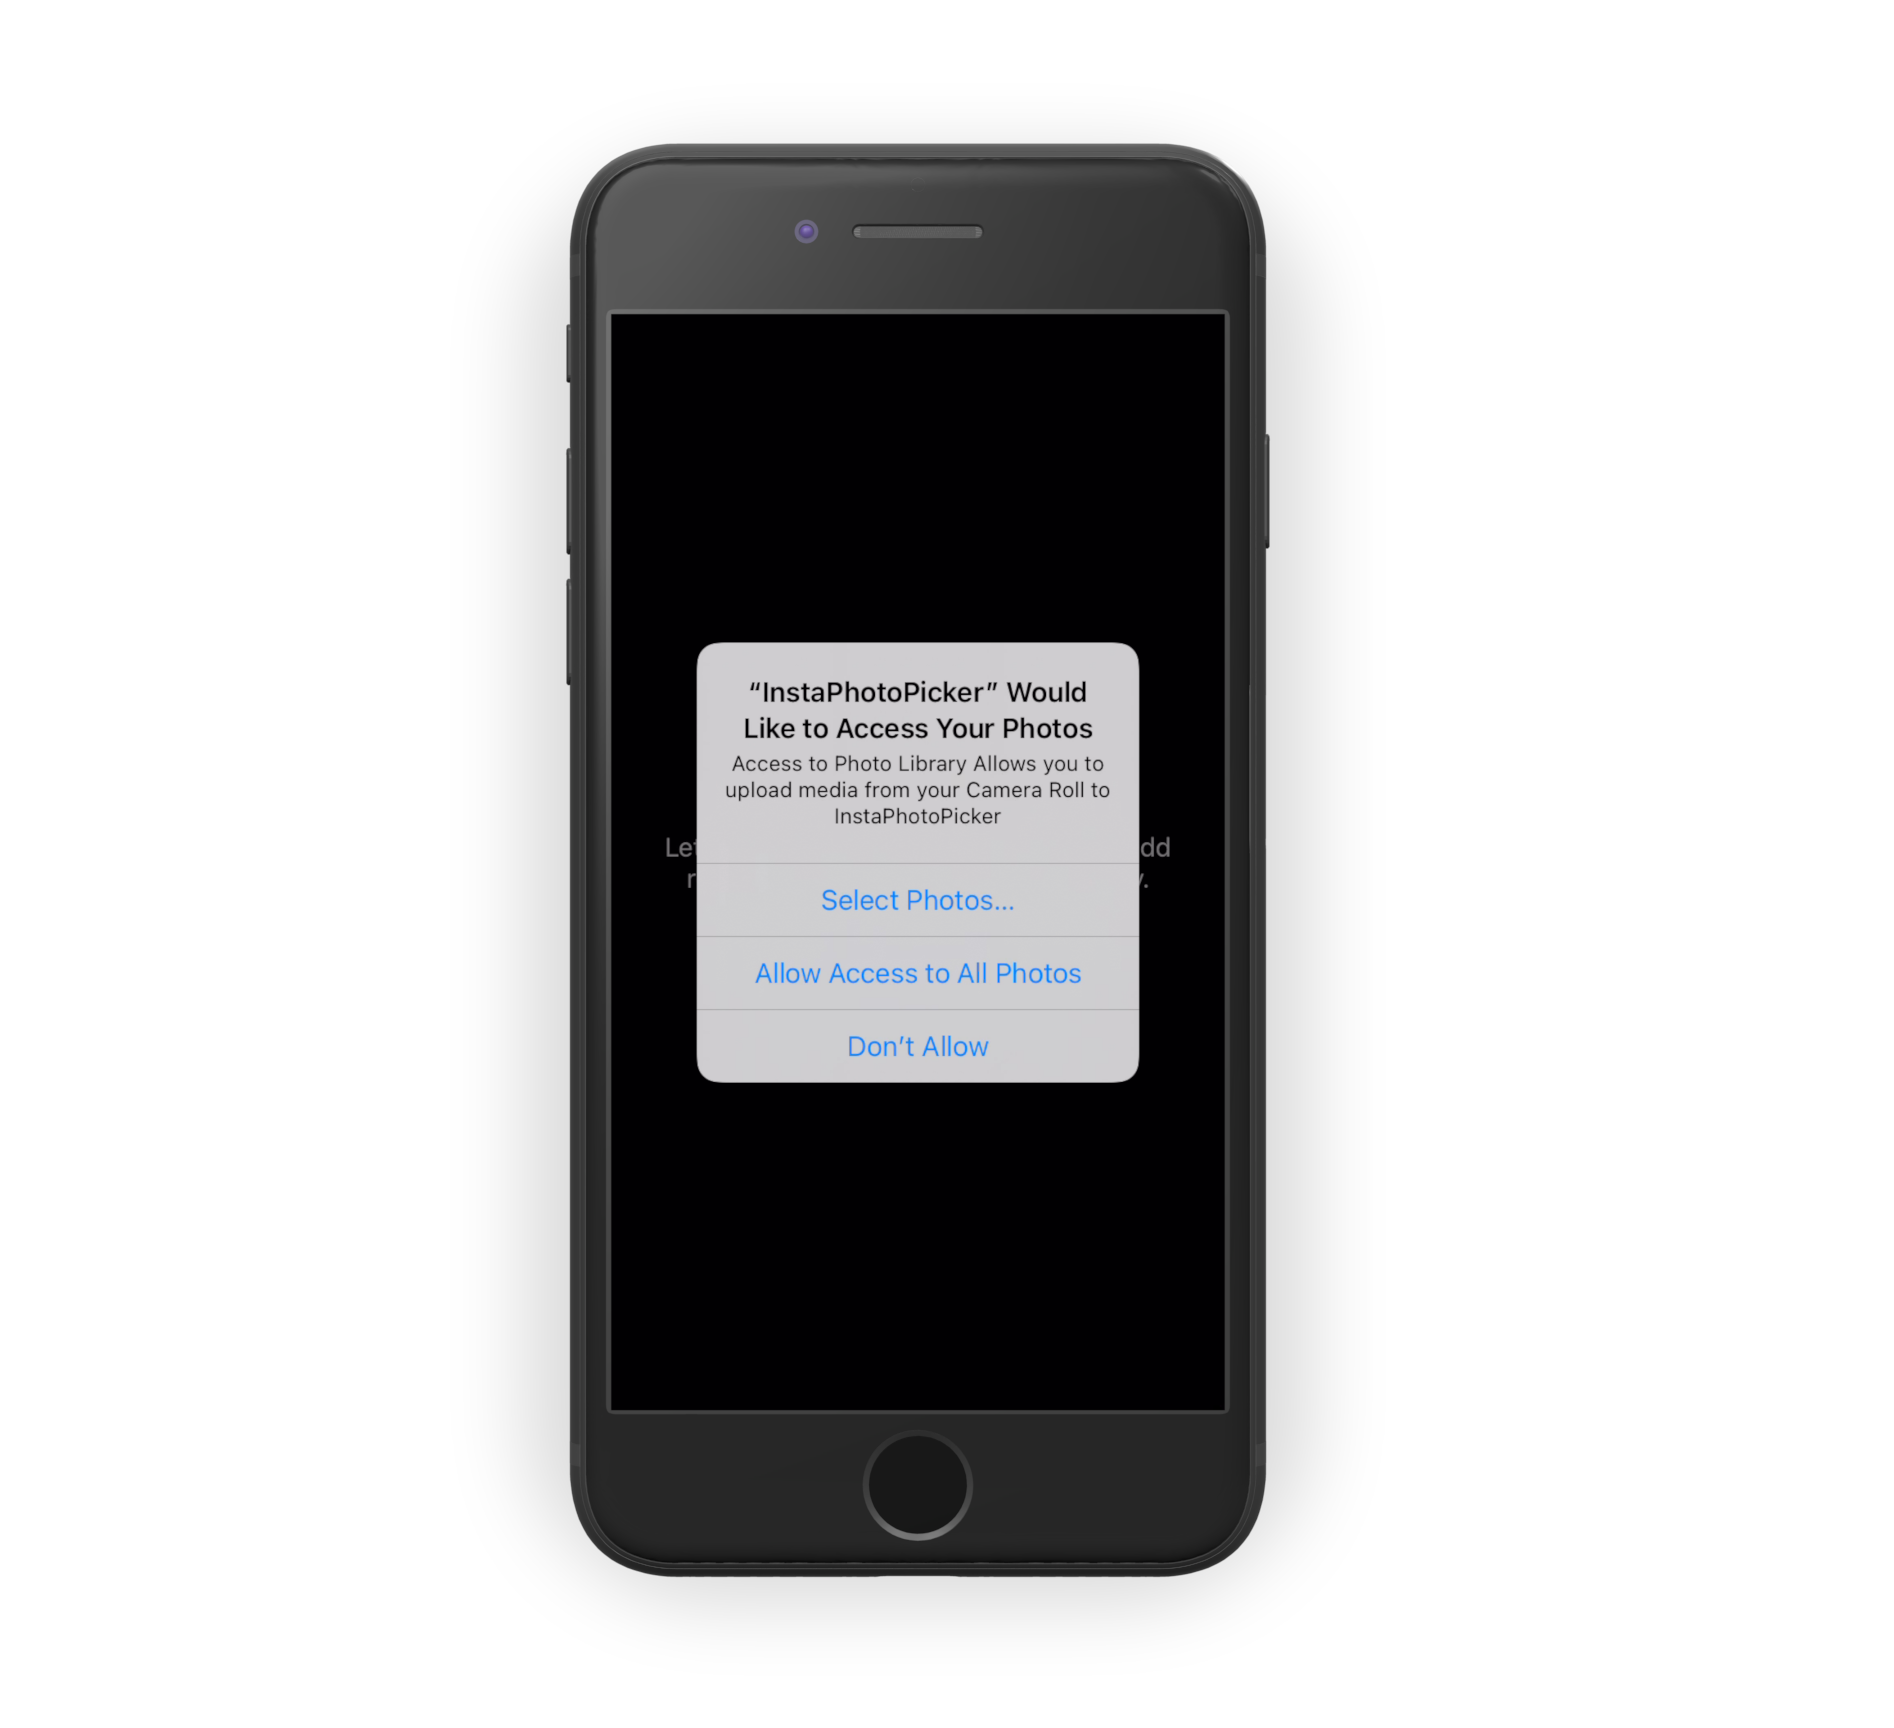
Great job! and just like that we are done with:
- How to Setup and Ask for User’s Photo Library Permission.
Understanding Photokit’s Main Objects
Before we proceed to actually fetching photos and videos. It’s important you get a quick overview of the main objects we will be working with. When working with PhotoKit, we’ll be dealing alot with these 3 objects:
PHAssets
TL;DR → Basically a metadata that represents an image, video, or Live Photo in the Photos library.PHAssetCollections
TL;DR → A group of PHAssets. Basically a user-created album, or an ios smart album.PHFetchResults
TL;DR → Basically PhotosKit's smart array that fetches and auto caches objects like PHAssets or PHAssetCollection.
PHAssets
First let’s make something absolutely clear, the PHAsset object is not an actual video or photo object. Don’t confuse it for a UIImage object. It’s a metadata that represents the image, LivePhoto, or video as it resides in the user’s photo library. It’s an immutable object that provide us the information we need to get the actual UIImage object or video URL, along with tons of other informations about them like their creation and modification dates, location data, favorite and hidden status etc.
PHAssetCollections
Sometimes you need to retrieve a group of assets, like in the case of an album in the user’s photo library. These are usually returned as a PHAssetCollection object. In essence, this is PhotosKit’s representation of an Album or Moment in the photo library.
PHFetchResult
A simplified way of thinking of PHFetchResult is to consider it an array, which it is. It contains all the same methods and conventions of arrays, such as count() and index(of:). Plus, it intelligently handles fetching data, caching it and re-fetching it as needed. You’ll be fine if you think of PHFetchResult as an intelligent array of assets or collections.
 Ok that makes sense 👍
Setting Up Photo Asset’s Data Models
Now that you got the gist of the main objects we will be using to fetch our photos and albums, it’s time to set up our data models. Still in our ViewController.swift, at the top of the file, add these under the marked Properties sections:
1
2
3
4
5
6
7
8
9
10
//MARK: - Properties
 // 1
 fileprivate var allPhotosInCurrentAlbum = PHFetchResult<PHAsset>()
 // 2
 fileprivate var smartAlbums = [PHAssetCollection]()
 // 3
 fileprivate var userCreatedAlbums = PHFetchResult<PHAssetCollection>()
 // 4
 fileprivate let listOfsmartAlbumSubtypesToBeFetched: [PHAssetCollectionSubtype] = [.smartAlbumUserLibrary, .smartAlbumFavorites, .smartAlbumVideos, .smartAlbumScreenshots]
For simplicity, i will be referring to PHFetchResult as a smart-array.
-
In essence, think of it as initializing an empty smart-array we will use in holding all the photos and videos we will be fetching from the photos library.
-
Initializing a regular array to hold the four smart-albums we will be fetching.
-
Initializing a smart-array that will hold all the user-created albums.
-
We will only be fetching those four distinct smart-albums from the photo library. This is a list we will use to filter for them. You might be thinking, “Hey, what is this PHAssetCollectionSubtype thing ?” Well, PHAssetCollectionSubtype is simply an enumerable value that describes the particular subtype of a PHAssetCollection. Basically a way for us to specify which exact smart albums we want to fetch.
Fetching Photo Assets and Albums
Still in the ViewController.swift file go to the fetchPhotoLibraryAssets method below the marked Photokit section and add the following code ↓
1
2
3
4
5
6
7
8
9
10
11
12
13
14
15
16
17
18
19
20
21
22
23
24
25
26
27
28
29
30
31
32
33
34
35
36
//MARK: - PhotoKits
 fileprivate func fetchPhotoLibraryAssets() {

        // 1
        let authStatus = PHPhotoLibrary.authorizationStatus()
        guard authStatus ==  .authorized || authStatus == .limited else {return}

        // 2
        DispatchQueue.main.async {
            self.askPhotoPermissionView.updateTexts()
        }

        // 3
        for collectionSubType in  listOfsmartAlbumSubtypesToBeFetched {
            if let smartAlbum = PHAssetCollection.fetchAssetCollections(with: .smartAlbum, subtype: collectionSubType, options: nil).firstObject {
                smartAlbums.append(smartAlbum)
            }
        }

        // 4
        let userCreatedAlbumsOptions = PHFetchOptions()
        userCreatedAlbumsOptions.predicate = NSPredicate(format: "estimatedAssetCount > 0")
        userCreatedAlbums = PHAssetCollection.fetchAssetCollections(with: .album, subtype: .albumRegular, options: userCreatedAlbumsOptions)

        // 5
        let fetchOptions = PHFetchOptions()
        let sortDescriptor = NSSortDescriptor(key: "creationDate", ascending: false)
        fetchOptions.sortDescriptors = [sortDescriptor]
        allPhotosInCurrentAlbum = PHAsset.fetchAssets(with: fetchOptions)

        // 6
        DispatchQueue.main.async {
            self.mediaPickerView.bindDataFromPhotosLibrary(fetchedAssets: self.allPhotosInCurrentAlbum, albumTitle: "Recents")
        }
    }
-
This gets us the current authorization status from PHPhotoLibrary. If we’ve not been granted authorization, we return out of the method.
-
This updates a UILabel’s text in the askPhotoPermissionView. Since the PhotoKit’s methods runs in the background thread, it’s important to update UI related stuff on the main thread.
-
When retrieving assets from the photo library with PHFetchResult, we can use a PHAssetCollectionSubtype object to retrieve a specific type of smart album. Here, we loop through our listOfsmartAlbumSubtypesToBeFetched and then we use the PHAssetCollection’s fetchAssetCollection method to fetch and append the recent, favorites, videos, and screenshot smart albums to the smartAlbums array we declared earlier.
-
When retrieving user created albums or smart albums, we can use a PHFetchOptions object to apply a set of sorting paramters to indicate how we would like the retrieved assets to be sorted. Here, we create a PHFetchOptions object and use a predicate to specify that we only want to fetch user created albums that contains at least one photo or video asset.
-
Here we create a sort descriptor that sorts assets by creation date from newest to oldest, and then we apply it to our PHFetchOptions object, before we use the PHAsset’s fetchAssets method to retrieve all the photo and video assets in the photo library.
-
PhotoKit’s methods runs in the background thread, so we jump to the main thread to pass our retrieved assets to the mediaPickerView for UI update.
Displaying All Photo Assets
Now that we are done fetching data from the Photo Library’s Data Store let’s display them in our UI.
Navigate to MediaPickerView.swift file in the Views folder and replace the collectionView’s cellforItem, numberOfItemsInSection and didSelectItem methods at the end of the class with these:
1
2
3
4
5
6
7
8
9
10
11
12
13
14
15
16
17
18
19
20
21
22
// 1
 func collectionView(_ collectionView: UICollectionView, cellForItemAt indexPath: IndexPath) -> UICollectionViewCell {
        let cell = collectionView.dequeueReusableCell(withReuseIdentifier: PhotoCell.cellReuseIdentifier, for: indexPath) as! PhotoCell
        cell.bind(asset: allPhotosInSelectedAlbum[indexPath.item])
        return cell
  }

// 2
 func collectionView(_ collectionView: UICollectionView, numberOfItemsInSection section: Int) -> Int {
        return allPhotosInSelectedAlbum.count
  }


// 3
 func collectionView(_ collectionView: UICollectionView, didSelectItemAt indexPath: IndexPath) {
      guard let cell = collectionView.cellForItem(at: indexPath) as? PhotoCell else {return}
      let asset = allPhotosInSelectedAlbum[indexPath.item]
      let image = getAssetThumbnail(asset: asset, size: PHImageManagerMaximumSize)
      cell.thumbnailImageView.image = image
      delegate?.handleTransitionToStoriesEditorVC(with: cell.thumbnailImageView)
    }
-
Here we are binding each photo’s asset to each individual cell’s UI.
-
Here is a good example of how you treat PHFetchResult as an array. We are Returning the number of assets in the PHFetchResult as the number of items in the collectionView.
-
Here we are getting the selected cell’s imageView and asset, then calling the getAssetThumbnail method to fetch the asset’s highest quality image. Then a delegate to handle the transition animation to StoriesEditorVC.
Note: To request the maximum possible size for a PHAsset’s image we use the PHImageManagerMaximumSize.
Getting UIImage from Photo Asset
The getAssetThumbnail method in the Constants.swift file inside the Misc folder is responsible for requesting a PHAsset’s image from the PHImageManager. In essence, this is how we convert a PHAsset object to a UIImage object. I suggest you click on the method and take a look at the code:
1
2
3
4
5
6
7
8
9
10
11
12
13
14
15
public func getAssetThumbnail(asset: PHAsset, size: CGSize) -> UIImage? {
    // 1
    let manager = PHImageManager.default()
    let options = PHImageRequestOptions()
    options.isSynchronous = true
    options.isNetworkAccessAllowed = true

    var thumbnail: UIImage?
    // 2
    manager.requestImage(for: asset, targetSize: size, contentMode: .aspectFill, options: options) {(imageReturned, info) in
        guard let thumbnailUnwrapped = imageReturned else {return}
        thumbnail = thumbnailUnwrapped
    }
    return thumbnail
}
- We instantiate PHImageManager with PHImageRequestOptions.
- Here we are requesting the image from the image manager. Providing the asset, size, content mode, and options. Size is the size at which you would like the image returned. contentMode is how you would like the image to fit within the aspect ratio of the size. The default value is aspectFill. And then finally we return the requested image in the result handler.
Alright now that we are done discussing how we fetch images from assets let’s build and run the project. In the app swipe up to view all the photos in the user’s photo library.
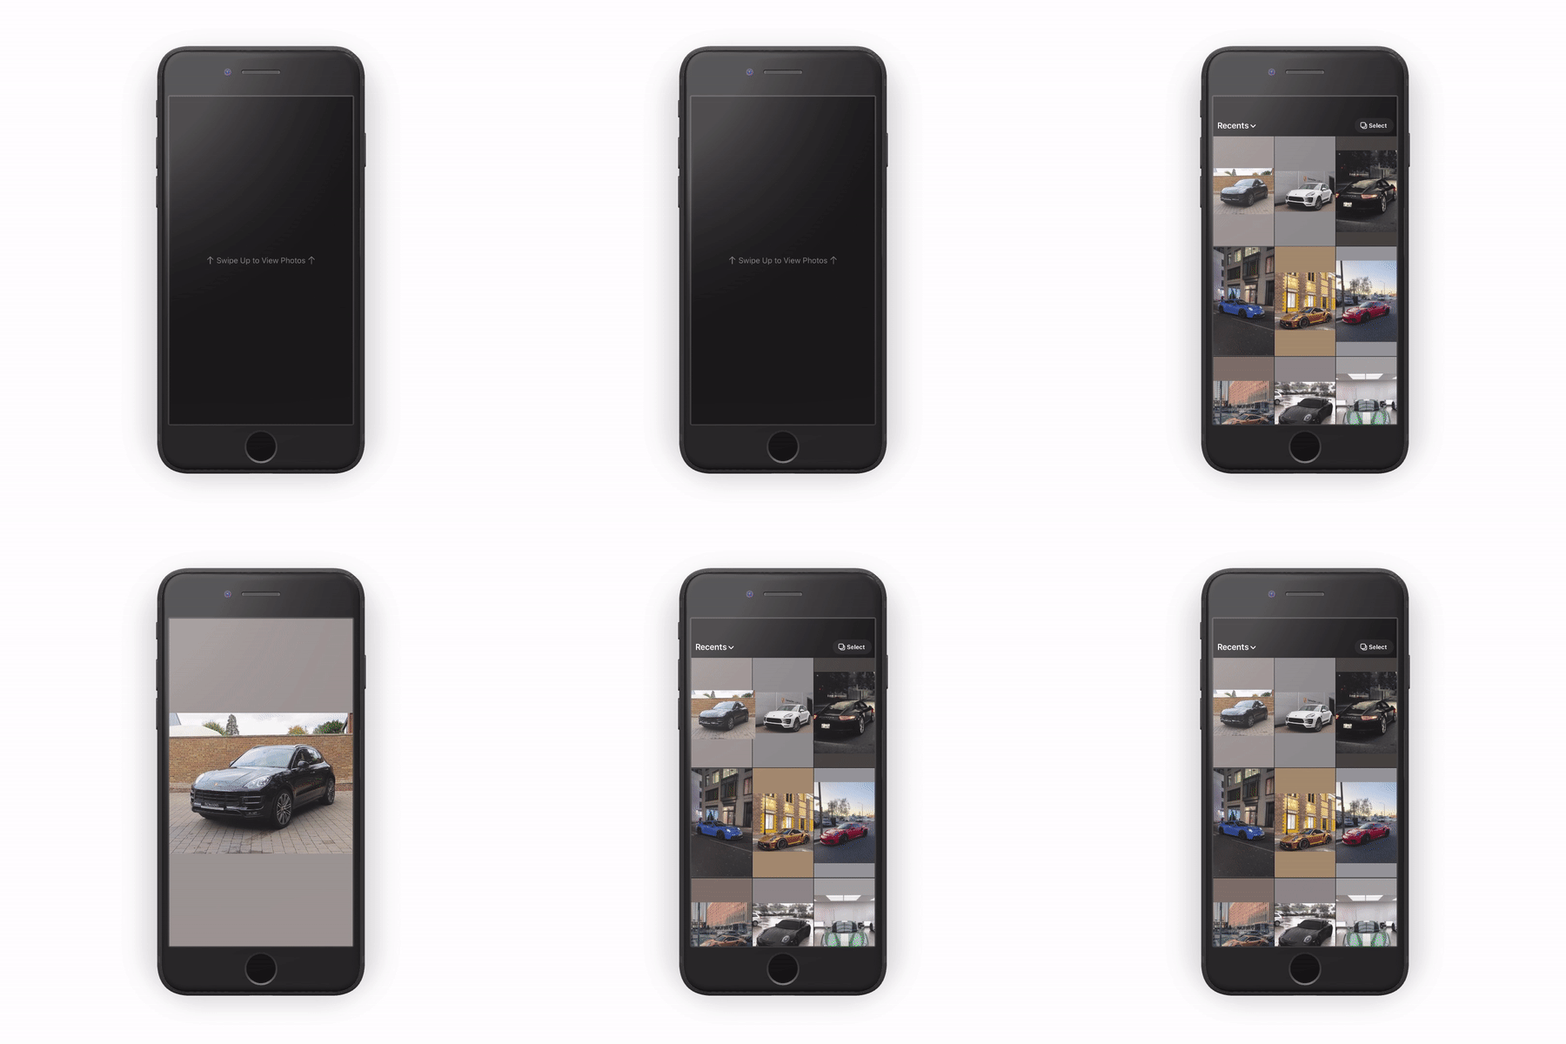 Hooray 🙌✊🥳🎉👏 our collectionview now has images!
- How to Retrieve Images from Assets.
Displaying Album Assets
Navigate back to the ViewController.swift file and find the handleOpenAlbumVC method in the marked MediaPickerViewDelegate section. Replace the code in the handleOpenAlbumVC method with the one below:
1
2
3
4
5
6
7
8
9
10
//MARK: - MediaPickerViewDelegate
func handleOpenAlbumVC() {
    // 1
     let albumVC = AlbumVC(smartAlbums: smartAlbums, userCreatedAlbums: userCreatedAlbums)
     albumVC.modalPresentationStyle = .custom
     albumVC.transitioningDelegate = self
     albumVC.delegate = self
     present(albumVC, animated: true, completion: nil)
}
- Here we are injecting the smart albums and user created albums we fetched into the albumVC initializer right before the albumVC is modally presented.
Now with the AlbumVC injected with the album assets, let’s use the assets to display the albums.
Displaying the cover image for an album is simply a matter of requesting each album’s cover image from the PHImageManager. The AlbumVC is almost set up to display albums, let us complete the setup process and get it working.
Head to the AlbumVC.swift file in the Controllers folder and add this below the marked properties section:
1
2
3
4
5
6
7
// 1
fileprivate lazy var smartAlbumSection = [SmartAlbumItem(albumName: "Search", imageName: "magnifyingglass"),
                                          SmartAlbumItem(albumName: "Recents", imageName: "clock", collection: smartAlbums[0]),
                                          SmartAlbumItem(albumName: "Favorites", imageName: "heart", collection: smartAlbums[1]),
                                          SmartAlbumItem(albumName: "Videos", imageName: "play.circle", collection: smartAlbums[2]),
                                          SmartAlbumItem(albumName: "Screenshots", imageName: "iphone", collection: smartAlbums[3])
    ]
- The smartAlbumSection is an array of SmartAlbumItems. This is a simple struct to power our tableView’s first section. Each item holds a albumName, imageName, and an optional PHAssetCollection(the actual smart-album). The PHAssetCollection property of the SmartAlbumItem is optional because we know the first item (the Search item) in the smartAlbumSection array will not a have a PHAssetCollection property.
Now scroll to the marked TableView Protocols section and let’s update the tableView’s cellForRowAt, didSelectRowAt, and numberOfRowsInSection methods to display our album’s UI:
Add the cellForRowAt method
1
2
3
4
5
6
7
8
9
10
11
12
func tableView(_ tableView: UITableView, cellForRowAt indexPath: IndexPath) -> UITableViewCell {
        let sectionType = albumSections[indexPath.section]
        switch sectionType {
        case .smartAlbums:
            let smartAlbumCell = dequeSmartAlbumCell(for: indexPath)
            return smartAlbumCell
        case  .userCreatedAlbums:
            let userCreatedAlbumCell = dequeUserCreatedAlbumCell(for: indexPath)
            return userCreatedAlbumCell
        }
    }
Here we deque each cell based on the album section type. Where section 0 is a smartAlbumCell and 1 is a userCreatedAlbumCell.
Above the cellForRowAt method update the dequeSmartAlbumCell method:
1
2
3
4
5
6
7
8
9
10
11
12
13
14
15
16
17
18
19
20
21
22
23
fileprivate func dequeSmartAlbumCell(for indexPath: IndexPath) -> UITableViewCell {
        //1 cell dequeing
         let smartAlbumCell = tableView.dequeueReusableCell(withIdentifier: smartAlbumCellIdentifier, for: indexPath)
         smartAlbumCell.backgroundColor = .clear
         smartAlbumCell.selectionStyle = .none

        //2 configuring SmartAlbumCell's UI and data binding
        let album = smartAlbumSection[indexPath.row]
        var contentConfig = smartAlbumCell.defaultContentConfiguration()
        contentConfig.text = album.albumName

        let config = UIImage.SymbolConfiguration(pointSize: 15, weight: .semibold, scale: .large)
        let image = UIImage(systemName: album.imageName, withConfiguration:
                                config)?.withRenderingMode(.alwaysTemplate)

        contentConfig.image = image
        contentConfig.imageProperties.tintColor = .white
        contentConfig.textProperties.color = .white
        contentConfig.imageToTextPadding = 12
        smartAlbumCell.contentConfiguration = contentConfig

         return smartAlbumCell
     }
- Here we are dequeing each smartAlbumCell.
- Configuring each smartAlbumCell with the new iOS 14.0+ tableview cell’s UI configurations. Then binding the smartAlbumSection data to display each smartAlbumCell’s title and icon.
Right below the dequeSmartAlbumCell method, update the dequeUserCreatedAlbumCell method:
1
2
3
4
5
6
7
8
9
10
11
12
13
14
15
16
17
18
19
20
21
22
23
24
25
26
27
28
fileprivate func dequeUserCreatedAlbumCell(for indexPath: IndexPath) -> AlbumCell {

         // 1
         let userCreatedAlbumCell = tableView.dequeueReusableCell(withIdentifier: userCreatedAlbumCellIdentifier, for: indexPath) as! AlbumCell
         userCreatedAlbumCell.backgroundColor = .clear
         userCreatedAlbumCell.selectionStyle = .none

         // 2
         var coverAsset: PHAsset?
         let aUserCreatedAlbum = userCreatedAlbums[indexPath.item]

         // 3
         let fetchOptions = PHFetchOptions()
         fetchOptions.fetchLimit = 1
         let sortDescriptor = NSSortDescriptor(key: "creationDate", ascending: false)
         fetchOptions.sortDescriptors = [sortDescriptor]

         // 4
         let fetchedAssets = PHAsset.fetchAssets(in: aUserCreatedAlbum, options: fetchOptions)
         coverAsset = fetchedAssets.firstObject
         guard let asset = coverAsset else { return userCreatedAlbumCell }

         // 5
         let coverImage = getAssetThumbnail(asset: asset, size: userCreatedAlbumCell.bounds.size)
         userCreatedAlbumCell.bindData(albumTitle: aUserCreatedAlbum.localizedTitle ?? "", albumCoverImage: coverImage)

         return userCreatedAlbumCell
     }
-
Here we are dequeing each userCreatedAlbumCell.
-
Here we create variables to hold an album’s photo asset, which we’ll use as the album’s cover image. And another variable to get each user-created album’s asset from our smart album assets.
-
Since we only want to fetch the most recent image in each user-created album, we use PHFetchOptions’s fetchLimit and sortDescriptor to limit our fetch result to the most recently added asset in the album.
-
We retrieve the album’s first asset using the PHAsset’s fetchAssets method (which is a PHFetchResult object) and set it as the cover asset.
-
We grab the cover asset’s image from PhotoKit’s PHImageManager using our getAssetThumbnail method and then bind the title and image data to power our album cell’s UI.
Add the numberOfRowsInSection method
1
2
3
4
5
6
7
 func tableView(_ tableView: UITableView, numberOfRowsInSection section: Int) -> Int {
        switch albumSections[section] {
        case .smartAlbums: return smartAlbumSection.count
        case .userCreatedAlbums: return userCreatedAlbums.count
        }
    }
Here we return the number of items in each section based on the album section type, so the tableView knows how many items to display in each section.
Add the didSelectRowAt method
1
2
3
4
5
6
7
8
9
10
11
12
13
14
15
16
17
18
19
func tableView(_ tableView: UITableView, didSelectRowAt indexPath: IndexPath) {
        switch albumSections[indexPath.section] {
        //1
        case .smartAlbums:

            if let smartAlbum = smartAlbumSection[indexPath.row].collection {
                delegate?.handleDidSelect(album: smartAlbum)
            } else {
                delegate?.handlePresentPHPickerViewController()
            }

            dismiss(animated: true)
        // 2
        case .userCreatedAlbums:
            delegate?.handleDidSelect(album: userCreatedAlbums[indexPath.row])
            dismiss(animated: true)
        }
    }
-
When the user selects an item in the smart-album section, we delegate the action to the parent ViewController.swift file, which is responsible for fetching all the photo or video assets in the selected album. Then we dismiss the AlbumVC. And if the user selects the search item we also delegate the ViewController.swift to present a PHPickerViewController, more on that later.
-
On selection of an item in the user created-albums section we delegate the action to the ViewController.swift file and dismiss the AlbumVC.
Run the project and open the albums. You should see albums with their names and cover images being displayed! Hooray 🙌✊🥳🎉👏 we are done displaying albums, all that’s left is changing our mediaPickerView’s photo assets to show the selected album’s photo assets when didSelectRow method is triggered in the AlbumVC.
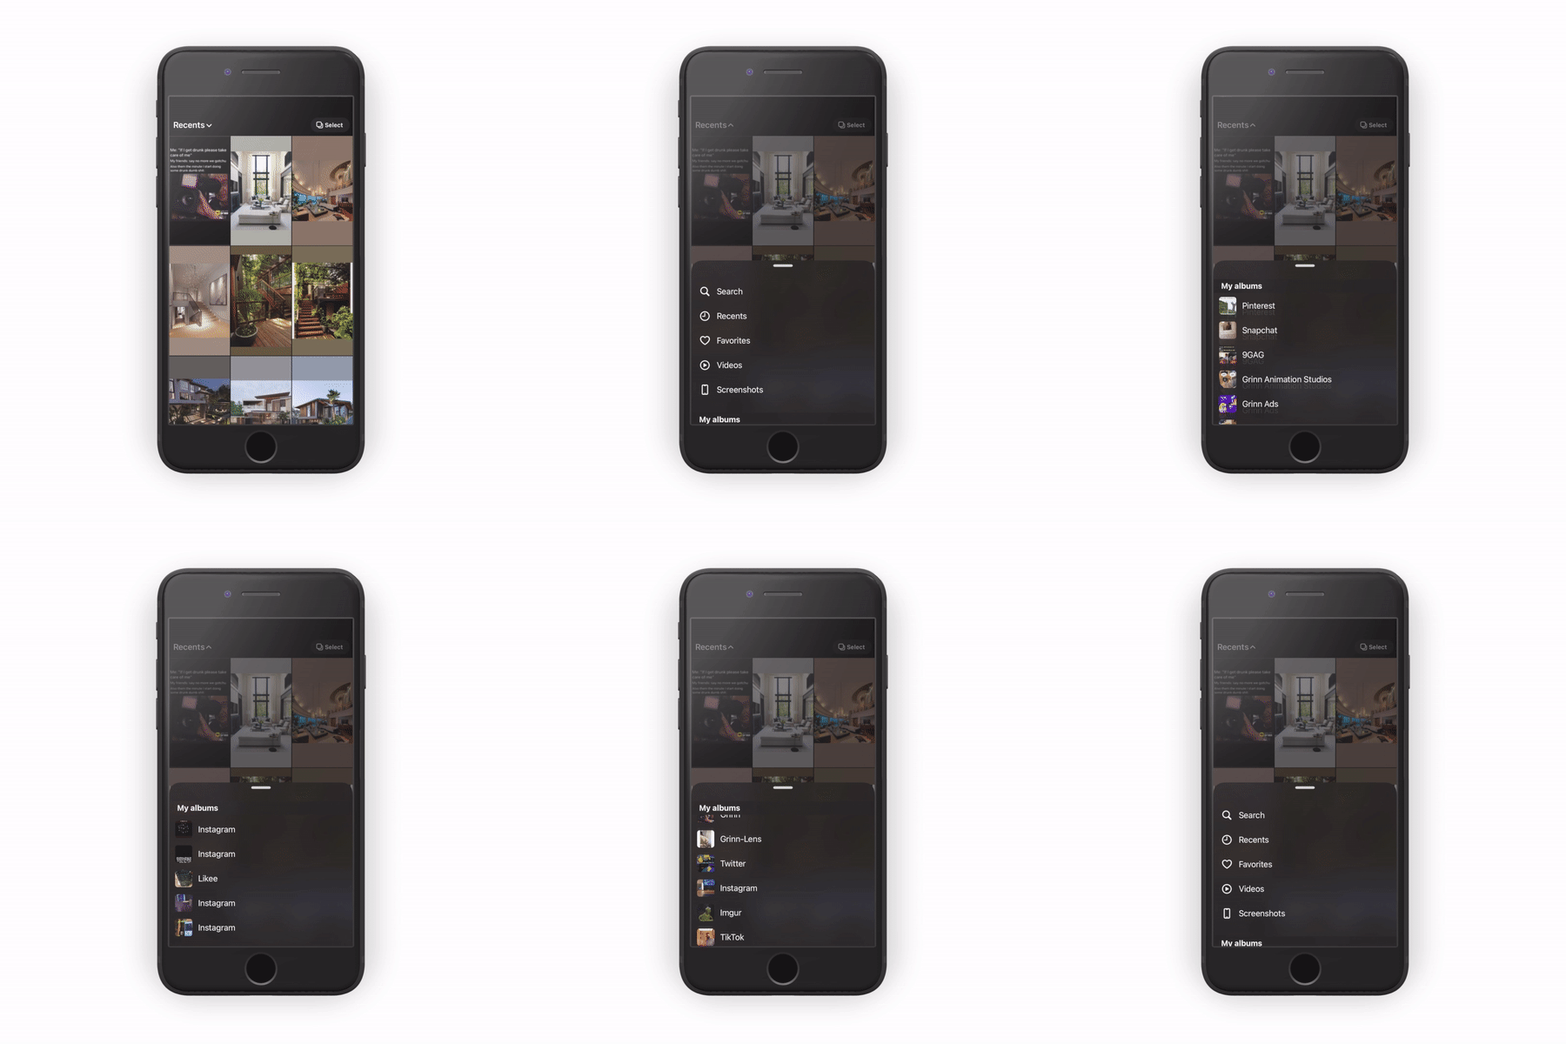 Hooray 🙌✊🥳🎉👏 we can now see our albums!
- How to Fetch Smart Albums and User-Created Albums.
- How to use the retrieved PHAssets and PHAssetCollections to power our UI.
Fetching Selected Album’s Photo Assets
To display the selected album’s photos in our mediaPickerView’s UI, navigate back to the ViewController.swift file. Locate the handleDidSelect method below the marked AlbumVCDelegate section and add the following code to it:
1
2
3
4
5
6
7
8
9
10

  func handleDidSelect(album: PHAssetCollection) {
        let fetchOptions = PHFetchOptions()
        let sortDescriptor = NSSortDescriptor(key: "creationDate", ascending: false)
        fetchOptions.sortDescriptors = [sortDescriptor]
        let fetchedAssets = PHAsset.fetchAssets(in: album, options: fetchOptions)
        allPhotosInCurrentAlbum = fetchedAssets
        mediaPickerView.bindDataFromPhotosLibrary(fetchedAssets: allPhotosInCurrentAlbum, albumTitle: album.localizedTitle ?? "")
    }
Pretty self-explanatory from our Fetching The Assets section. Here we are simply fetching the selected album’s assets and passing it to our mediaPickerView for UI update.
Now let’s run the project, open the albums and select any album, you should see the mediaPickerView’s photo assets update to display the selected album’s photos.
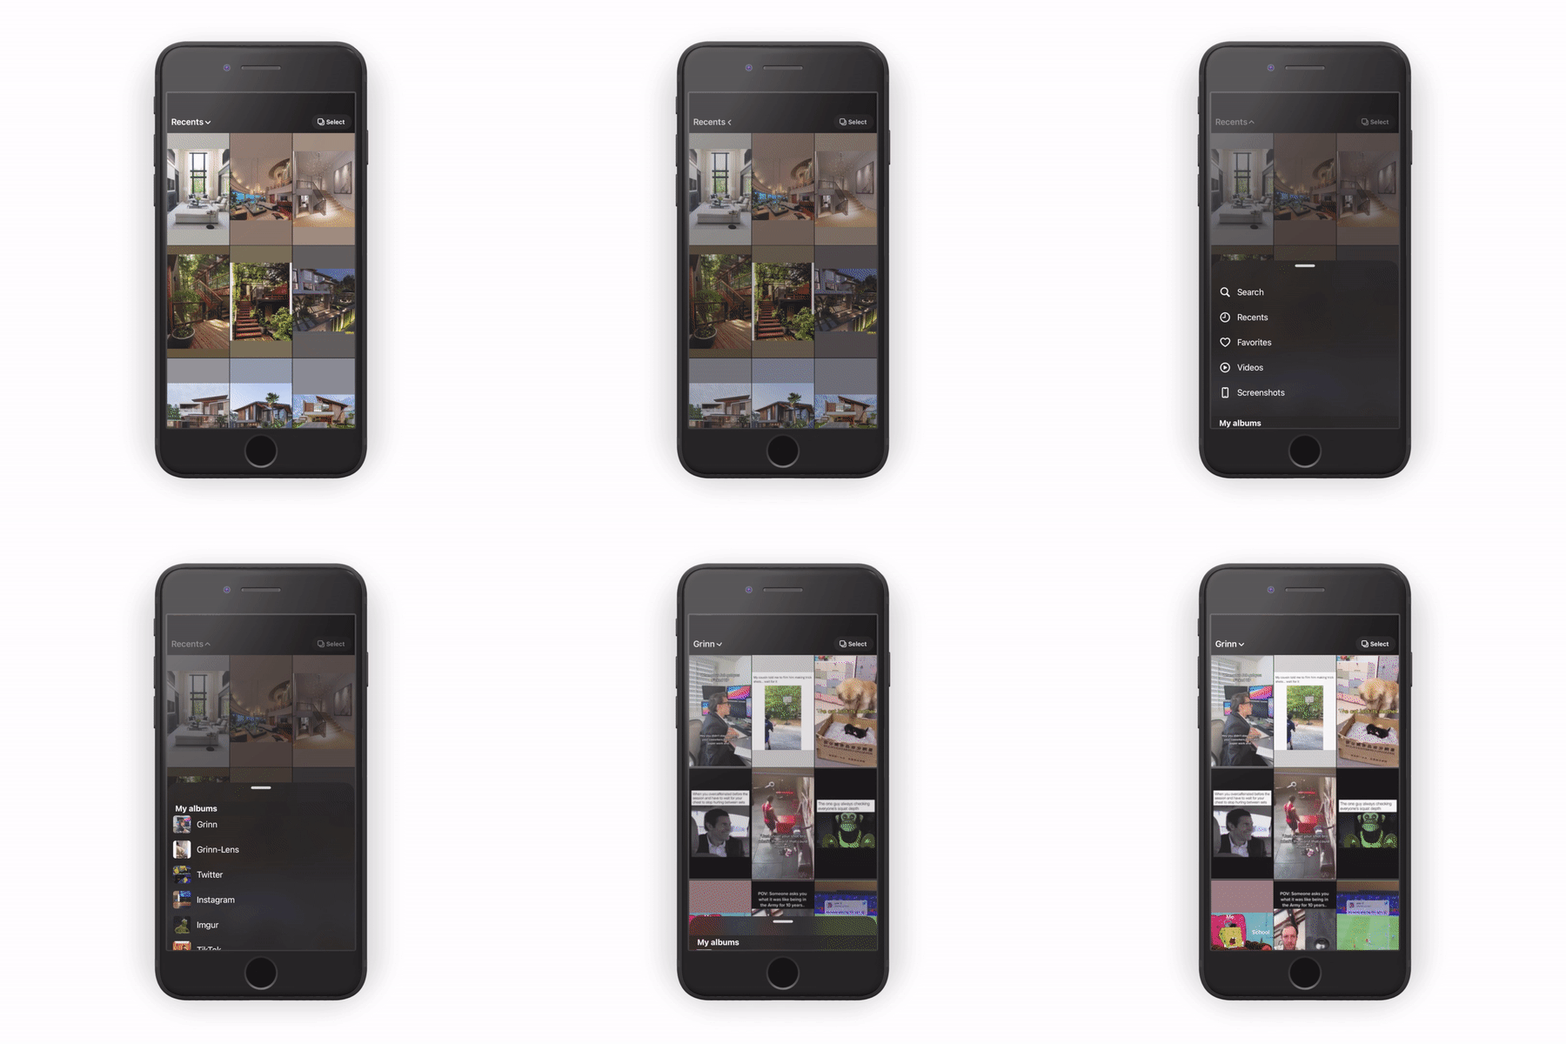 Hooray 🙌✊🥳🎉👏 we can now change albums!
- How to Fetch all Photo Assets in a Specific Album.
Searching Photo Library Assets Using PHPickerViewController
The first item in our smart album section is a search item. To mimic the instagram app’s design of this UX flow we will be using the PHPickerViewController. A view controller that was introduced in iOS 14+ as an alternative to UIImagePickerController for providing the user interface to search and pick photos from the photo library.
The PHPickerViewController uses the traditional delegate model that will alert you upon user interation completion.
Still in the ViewController.swift file, locate the handlePresentPHPickerViewController method which is below the marked AlbumVCDelegate section and update it content to this:
1
2
3
4
5
6
7
8
9
10
11
12
func handlePresentPHPickerViewController() {
        // 1
        DispatchQueue.main.asyncAfter(deadline: .now() + 0.2) {
            // 2
            var configuration = PHPickerConfiguration(photoLibrary: PHPhotoLibrary.shared())
            configuration.selectionLimit = 10
            // 3
            let picker = PHPickerViewController(configuration: configuration)
            picker.delegate = self
            self.present(picker, animated: true, completion: nil)
        }
    }
-
We are using the DispatchQueue’s async delay method to ensure that the AlbumVC was dismissed before we attempt to present the PHPickerViewController.
-
The PHPickerConfiguration enables us to set a multi-selection limit, which we set to 10.
-
We instantiate the PHPickerViewController and set it’s delegate before presenting it.
Note: We can also filter the type of media that is presented to the user via PHPickerViewController by using configuration.filter = .images or configuration.filter = .any(of: [.livePhotos, .images]).
PHPickerViewControllerDelegate
Just below the handlePresentPHPickerViewController method we have the marked PHPickerViewControllerDelegate section. Update the picker() method to this:
1
2
3
4
5
6
7
8
9
10
func picker(_ picker: PHPickerViewController, didFinishPicking results: [PHPickerResult]) {
        // 1
        dismiss(animated: true)
        let identifiers = results.compactMap(\.assetIdentifier)
        let fetchResult = PHAsset.fetchAssets(withLocalIdentifiers: identifiers, options: nil)
        // 2
        DispatchQueue.main.async {
            self.mediaPickerView.bindDataFromPhotosLibrary(fetchedAssets: fetchResult, albumTitle: "Search Result")
        }
    }
-
First we dismiss the PHPickerViewController upon completion of asset selection. Then we retrieve the selected assets using PHAsset’s fetchAssets method with the assetIdentifier property.
-
We pass the retrieved assets off to be displayed by the mediaPickerView’s UI.
Now let’s run the project, open the album and tap the search item. The PHPickerViewController will present a familiar UI of your photos and albums. Search and select photos and then tap the add button to dismiss. You should have something similar to this happening:
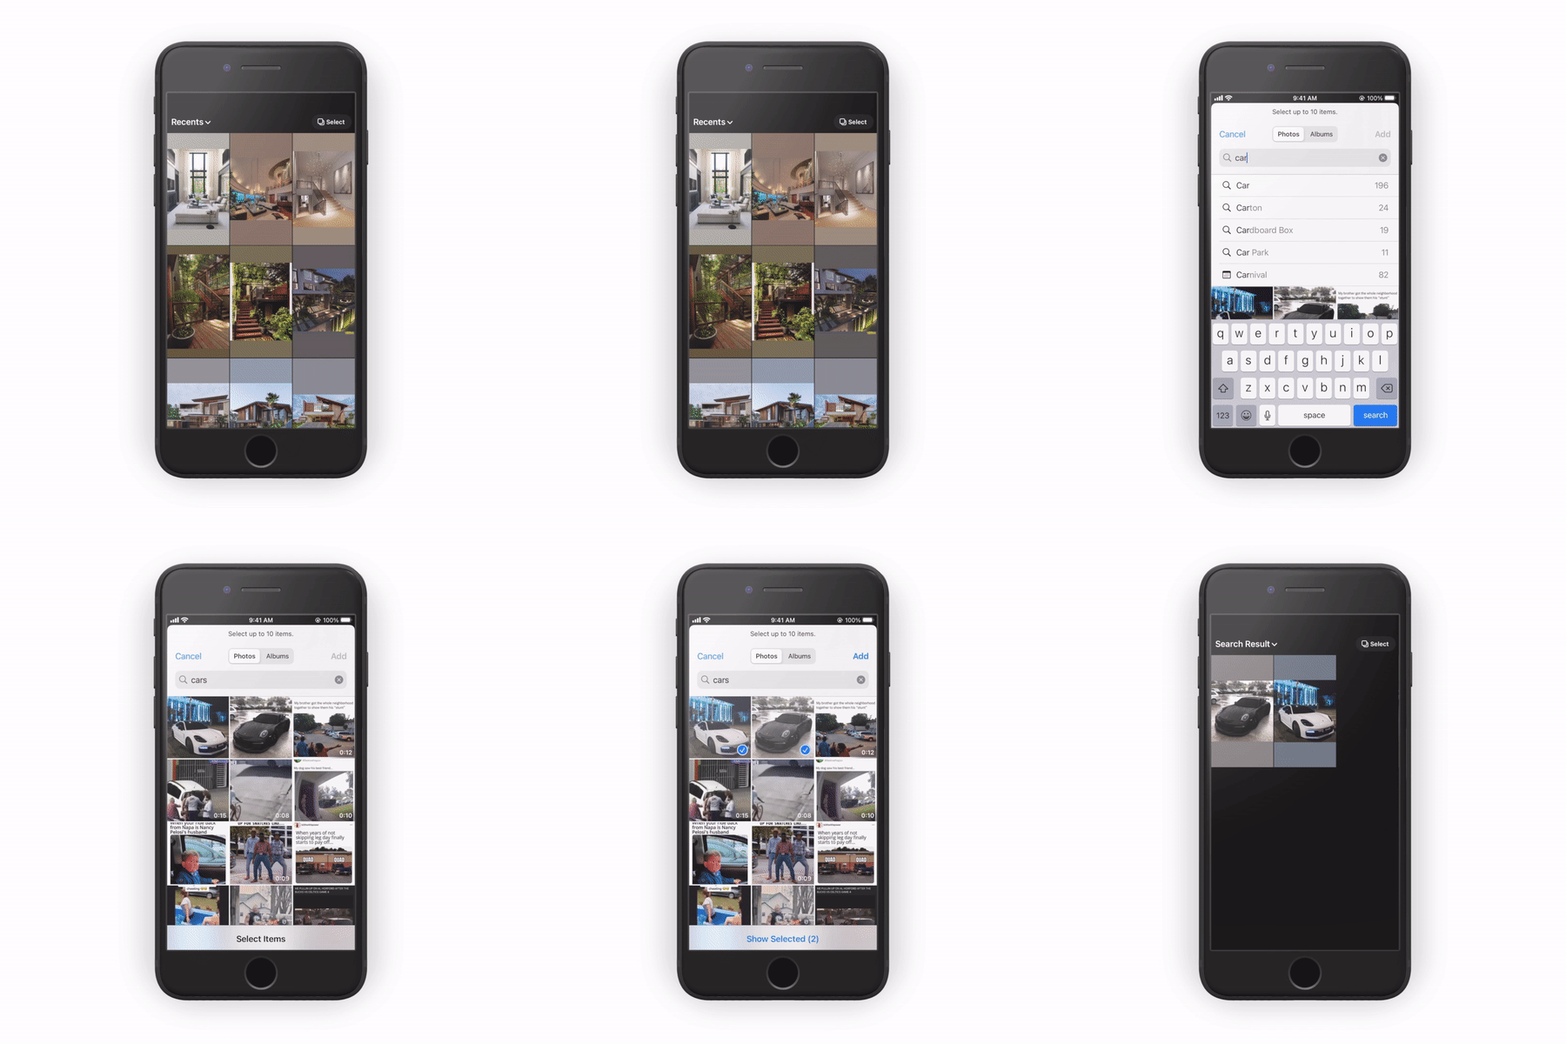 PHPickerViewController Search Demo
- How to use PHPickerViewController to search and select specific assets.
Listening For Changes Using PHPhotoLibraryChangeObserver
Now that our app is running nicely let’s address how to handle changes in the photos library.
We listen to changes in the photos library such as when a photo is deleted, added or edited by subscribing to the PHPhotoLibraryChangeObserver.
According to Apple’s own documentation, the PHPhotoLibraryChangeObserver protocol notifies you of changes that occur in the photo library, regardless of whether those changes are made by your app, by a user in the Photos app, or by another app that uses the Photos framework.
Listening For Changes in ViewController
To register for updates in the ViewController.swift file navigate to the fetchPhotoLibraryAssets method. Add this registration code anywhere below the PHPhotoLibrary.authorizationStatus() logic:
1
2
3
4
5
6
7
8
9
10
11
12
13
14
15
16
fileprivate func fetchPhotoLibraryAssets() {

  // 1
 let authStatus = PHPhotoLibrary.authorizationStatus()
 guard authStatus ==  .authorized || authStatus == .limited else {return}

    // ADD THIS LINE OF CODE BELOW 1.
    // Please note We are only subscribing to PHPhotoLibraryChangeObserver if we have authorization to access photo library.
   PHPhotoLibrary.shared().register(self)

.
.
.
.
  }
With our ViewController.swift listening for changes. Add this in the deinit method to remove the listener.
1
2
3
4
deinit {
  PHPhotoLibrary.shared().unregisterChangeObserver(self)
}
Scroll down to the end of the ViewController.swift file and conform to the PHPhotoLibraryChangeObserver protocol with the following code:
1
2
3
4
5
6
7
8
9
10
11
12
13
14
15
//MARK: - PHPhotoLibraryChangeObserver
extension ViewController: PHPhotoLibraryChangeObserver  {
    // 1.
    func photoLibraryDidChange(_ changeInstance: PHChange) {
        DispatchQueue.main.async {
            // 2.
            if let changeDetails = changeInstance.changeDetails(for: self.allPhotosInCurrentAlbum) {
                self.allPhotosInCurrentAlbum = changeDetails.fetchResultAfterChanges
                // 3.
                self.mediaPickerView.bindDataFromPhotosLibrary(fetchedAssets: self.allPhotosInCurrentAlbum, albumTitle: self.mediaPickerView.getCurrentAlbumTitle())
            }
        }
    }
}
-
The change observer has only one method: photoLibraryDidChange(:). Every time the photo library changes, it triggers this method.
-
We need to check if the update affects our allPhotosInCurrentAlbum assets. Using changeInstance, a property that describes the photo library changes, by calling its changeDetails(for:) method and passing in our asset. It returns nil if our allPhotosInCurrentAlbum assets is not affected by the changes. Otherwise, we retrieve the updated copy of the allPhotosInCurrentAlbum assets by calling fetchResultAfterChanges.
-
Refreshing the mediaPickerView’s UI to reflect the changes.
Listening For Changes in AlbumVC
Similar to what we just did in the ViewController.swift file, let’s go to the AlbumVC.swift file to register for changes in album assets. Find the viewDidLoad method in the albumVC and modify it to this:
1
2
3
4
5
6
7
8
9
10
    override func viewDidLoad() {
        super.viewDidLoad()
        setUpTableView()
        view.backgroundColor = .clear
        // ADD THIS TO VIEWDIDLOAD
        let authStatus = PHPhotoLibrary.authorizationStatus()
        if authStatus ==  .authorized || authStatus == .limited {
            PHPhotoLibrary.shared().register(self)
        }
    }
Here we are registring for changes only if we are authorized to access photo library.
Similar to before lets remove the ChangeObserver listener in the deinit method. Add this anywhere in the marked Init section of your AlbumVC:
1
2
3
deinit {
        PHPhotoLibrary.shared().unregisterChangeObserver(self)
    }
Scroll down to the end of the AlbumVC.swift file and conform to the PHPhotoLibraryChangeObserver protocol with the following code:
1
2
3
4
5
6
7
8
9
10
11
12
13
14
//MARK: - PHPhotoLibraryChangeObserver
extension AlbumVC: PHPhotoLibraryChangeObserver  {

    func photoLibraryDidChange(_ changeInstance: PHChange) {
        DispatchQueue.main.async {
            //1.
            if let changeDetails = changeInstance.changeDetails(for: self.userCreatedAlbums) {
                self.userCreatedAlbums = changeDetails.fetchResultAfterChanges
            }
            self.tableView.reloadData()
        }
    }

}
- Since only the user-created album section has cover images, that’s the only assets we should be listening to for changes. We check if the update affects our userCreatedAlbums assets. Use changeInstance with it’s changeDetails(for:) method to retrieve the updated copy of the userCreatedAlbums assets by calling fetchResultAfterChanges.
Voilà! just like that our AlbumVC.swift and ViewController.swift files are now listening for any changes that occurs in the photo library!
- How to use the PHPhotoLibraryChangeObserver protocol to keep our assets up to date.

Congratulations!
You did it! 🙌✊🥳🎉👏 you just replicated Instagram story’s custom photo picker. That was a lot to digest in a short time, hopefully you got a good introduction to the power of apple’s photokit framework. Remember to download the source code.
So far we’ve covered:
- How to Setup and Ask for User’s Photo Library Permission.
- How to Fetch Smart Albums and User-Created Albums.
- How to Fetch all Photo Assets in a Specific Album.
- How to Retrieve Images from Assets.
- How to use the retrieved PHAssets and PHAssetCollections to power our UI.
- How to use PHPickerViewController to search and select specific assets.
- How to use the PHPhotoLibraryChangeObserver protocol to keep our assets up to date.
What’s Next?
The PhotoKit is a robust framework with much to offer. There is still so much we can do with the impressive library that’s beyond the scope of this tutorial. There are cool stuff like LivePhoto, video and the photo editing functionalities etc. Check out the Apple’s PhotoKit Documentation for more information.
That’s all folks, I hope you liked the tutorial 👋.